Tuesday, July 31, 2012

Simple Tomato Pulao/Rice


I have posted my tomato and green peas pulao with coconut milk but today's recipe is a simple yet quick version of tomato rice.
As we liked the flavor and taste of this rice,my mom used to make this pulao for our lunch box atleast weekly twice along with some simple potato fry or raw banana fry.Now my son is a great fan of this rice and likes to have it with chicken fry.Here is the recipe for simple and flavorful rice..........

Ingredients


IngredientQuantity
Basmathi rice1cup
Onion1no.(medium size)
Tomato3nos.(medium size)
Green chilly5nos.
Curry leaves1sprig
Garlic(thinly sliced)3-4 cloves
Mint leaves10nos.
Coriander leavesas needed
Chilly powder1/2tsp
Coriander powder3/4tsp
Gram masala powder1/8tsp
Oil+ghee11/2tbs
Saltto taste
For the seasoning
IngredientQuantity
Cloves3nos.
Cinnamon1inch piece
Cardamom1no.
Bay leaf1no.
Fennel seeds1/2tsp
Star anise1no.


Method

                             Soak the basmathi rice in water for 15 minutes and cook it along with a  pinch of salt and a tsp of oil.Once the rice is done spread it on a plate and let it cool.
Heat a pan with oil and ghee and do the seasoning with the whole garam masala and cashews.Add the onion,green chilly,garlic,curry leaves and saute till transparent with a pinch of salt.Now add in the finely chopped tomatoes and cook it mushy.
Once the tomatoes are cooked add the powders and fry it for a minute,sprinkle 2tbs of water and cook it till the raw smell goes away.Add the coriander leaves and give it a mix.Put off the stove.
 Now add the cooked rice and mix it gently and turn on the stove and keep the mixed rice in a low flame for 5 minutes covered with a lid to incorporate the flavors.
Serve it with raitha,chips or fry.

Enjoy......................................

  • A tsp of ginger&garlic paste can also be added for extra flavor.
  • Fresh or frozen peas can be used and some times I puree the tomato and added.


Sumber http://www.naliniscooking.com

Tuesday, July 24, 2012

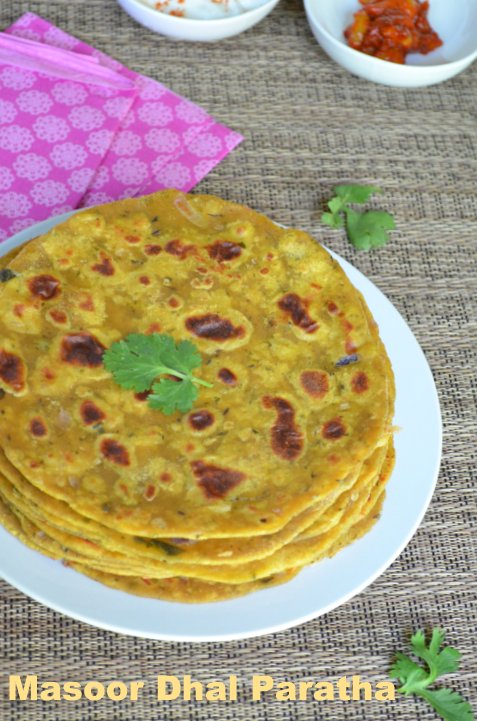
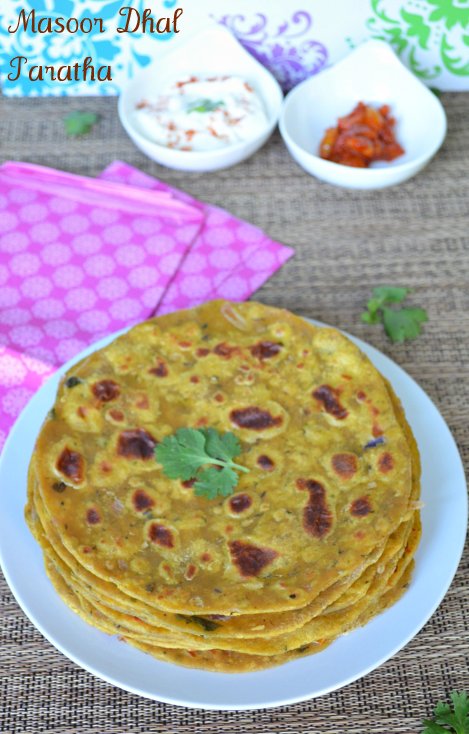
Masoor Dhal Paratha


Today's recipe is a healthy,protein rich and simple to make parathas which can be made with the left over cooked dhal.
I usually make this paratha for dinner and use the dhal which I cooked for lunch.To make it more flavorful I add the kasoori methi to the dhal and mix it with the flour.
This paratha is a healthy option for lunch which doesn't need any special side dish,yogurt and pickle tastes awesome with this paratha.Now to the recipe..............

Ingredients


IngredientQuantity
Wheat flour/kothumai maavu2cups
Masoor dhal1/4cup
Onion(chopped)1no.(medium size)
Green chilly(chopped)3-4nos.
Curry leaves(karivepillai)1sprig(chopped)
Coriander leaves/kothamalli 2tsp(chopped)
Kasoori methi3-4tsp
Turmeric powder/manjal podi1/8tsp
Cumin seeds/jeeragam1/2tsp
Asafoetida/perunayama pinch
Oilto cook
Saltto taste
Aamchur powder1/4tsp
Salta pinch


Method

                                  Pressure cook the dhal with enough water and cook it till it becomes soft,keep aside.
Heat a pan with 2tsp of oil and crackle the cumin seeds and asafoetida,add the chopped onion,curry leaves and green chilly.Saute it till transparent now add the cooked dhal,turmeric powder salt.Let it cook for one boil.
Finally add the kasoori methi,chopped coriander leaves and aamchur powder and put off the stove.Let the dhal cool completely.
Once the dhal cools down add it to the wheat flour with a pinch of salt and mix it to a soft,piable dough without adding water.
Divide the dough into equal balls and roll it on a floured surface to a circle to desired thickness.
Heat a griddle and cook both sides till golden spots appear on the paratha,drizzle a tsp of oil.
Serve it with yogurt and pickle.

  • Any type of dhal can be used,make sure the dhal should be thick and not thin.
  • While cooking the dhal in the pressure cooker do not add too much of water.
  • Instead of kasoori methi,fresh methi leaves can be added along with the onion while sauteing.
  • To make it more healthier grated carrot can also be added in the dhal.
Linking this to the Show me your HITS event happenings at my space started by Sangeetha of Spicy Treats.
Sumber http://www.naliniscooking.com

Thursday, July 19, 2012

Murukku Vathal/Koozh Vathal(Vadam)

Murukku vathal is also called as koozh vathal and we make it every summer and stored.In my grandparents place every summer vacation my mom,her sister and aunts make this vadam in a large quantity.When we were kids my cousins,sister and myself used to help them in spreading the vadam in the terrace.This vadam needs a lot of sunlight and it takes 3 days atleast to dry.
As the temperature reaches 100 degrees Fahrenheit here I wanted to try the vadam this year for first time as per my mom's method.I scaled down the measurement as the space for me to spread the vadam is less.It came out very nice and here goes the recipe........

Ingredients

IngredientQuantity
Rice Flour/Arisi maavu2cups
Sago/javvarisi1/2cup
Green chilly10-12nos.
Asafoetida/perungayam1/8tsp
Cumin seeds/jeeragam2tsp
Salt2tsp or as needed
Water9-10cups

Method

                            Soak the sago for 1-2 hours and grind it in a blender along with green chillies to a fine paste.In a wide bowl take the rice flour,ground paste,salt,asafoetida and mix it well with 2-3 cups of water and keep aside.
Keep a heavy bottom pan in the stove top and boil the remaining water,once the water starts boil add the prepared mixture to the boiling water.
Stir it continuously till the mixture reaches a dough like consistency as shown in the picture and make sure no lumps formed.Finally add the cumin seeds and give it a mix.Let it cool down.
Meanwhile spread a wet cotton cloth or plastic sheet in a sunny area.Fill the murukku maker with prepared koozh with a single eyed star or tape shaped disc.Squeeze it on the cloth or plastic sheet to a straight line evenly.Let it dry in the hot sun for 3 days.After it dries completely peel it from the plastic sheet or cloth and dry it completely till it becomes crisp,store it in containers.
Fry it in the oil whenever needed.

Enjoy..............................................
  • The amount of water depends on the quality of rice and sago,so keep in reserve some hot water.
  • If the prepared batter is too thick the add the hot water and mix it well.
  • One tbs of lemon juice can be added to the koozh after cooling for tangy taste.
  • Make sure the mixture becomes cool while squeezing otherwise the vadam turns out brown in clour while frying.
  • Instead of rice flour the raw rice can be soaked and grind it to a paste and used.
  • If you are using cotton cloth for squeezing,sprinkle water to remove the dried vadams from the cloth for easy removal and dry it completely.


Sumber http://www.naliniscooking.com

Monday, July 16, 2012

Mango Kesari/Mango Semolina Pudding

Last week was my kiddo's 7th birthday,I made this mango kesari and he was so happy to eat his favorite mango flavored sweet.Here is the recipe for tempting sweet............

Ingredients


IngredientQuantity
Semolina/rava1cup
Sugar11/4cups
Condensed milk4tbs
Mango pulp3/4cup
Ghee/nei6tbs
Cashews(finely chopped)2tbs
Almonds(finely chopped)1tbs
Cardamom powder/ellakai podi1/4tsp
Water21/2cups
Salta pinch


Method

                     Heat a pan with 1tbs of ghee and roast the rava in a medium flame till it turns pink and a nice aroma comes.Meanwhile boil the hot water and add the hot water to the roasted rawa,cook it till it becomes thick.
Now add the sugar and condensed milk and mix it well till the sugar melts and incorporates well.Add the remaining ghee and mix it well.
Add the mango pulp and mix it well till everything gets blend.
Now add the fried cashews,almonds and finally cardamom powder and mix it well.
Delicious mango kesari is ready.

Enjoy.............................................

  • If fresh mangoes are used increase the quantity of sugar to 11/2 cups.
  • The rawa needs to be fried in the medium flame,otherwise kesari will be sticky.
  • Adding the condensed milk gives a rich taste to the kesari.
  • Saffron can be added for extra flavor.

Sumber http://www.naliniscooking.com
Friday, July 13, 2012

Cream of Rice to make Rice Upma(Arisi Upma)and Steamed Dumpling(Kozhukattai)

Today is the final day for this week of Blogging Marathon #18 and today's post is how to make the rice rawa for upma  and kozhukattai.
Arisi upma is a breakfast or dinner item served along with the coconut chutney or brinjal kothsu.For this upma the rice needs to be processed and broken into rawa and used.The rawa can be prepared in ahead and stored.
My grandmother used a stone processor to break the rice and she uses only rice.One of my friend's grand mom uses toor dhal or moong dhal along with the rice and the upma is very tasty.Since then I also added dhal along with rice.
If you spend 20-30 minutes in the kitchen with your blender or food processor the rawa will be ready.It is very handy to make upma in a lazy day or kozhukattai as a evening snack for the kids.

Ingredients

IngredientQuantity
Raw rice/Paccharisi3cups
Toor Dhal/thuvaram paruppu1/2cup

Method 

  • Rinse the rice and dhal 2-3 times and soak it with enough water for an hour.After an hour drain the water completely and spread it on a cotton towel or cloth.Let it dry for an hour,it should be damp.
  • Take the rice and dhal mixture in a blender or food processor and pulse to the rawa consistency.Once everything is done dry the broken rice and dhal mixture under the shade or sunlight till it gets completely dried.
  • After drying completely sieve it in a fine strainer so that the powdered one will be separated and store the rice rawa in an air tight container.

  • The soaking time should be exactly an hour only,if it soaks for a long time it get powdered.
  • The drying time for the soaked rice is also very important,it should be damp enough to get a perfect coarse rawa.
  • The broken rice can be sun dried or dried under the shade,sometimes in winter I dry it in the oven.Pre-heat the oven for 200F for 5 minutes and put off.Then spread the rawa in a aluminum tray and keep it inside.
  • There won't be any moisture in the rawa while storing and this can be stored in the normal temperature for 3 months.
  • As we like the coarse one,I made it little bit grainy,it depends on personal preference.
Check the Blogging Marathon for the fellow bloggers participate in Blogging Marathon#18.
Sumber http://www.naliniscooking.com

Thursday, July 12, 2012

Bajji,Bonda and Pakoda Mix


Bajji,bonda and pakodas are the tempting deep fried snacks with the same base,the gram flour and rice flour.
I always make the mix and store it in the freezer to make bajjis or pakodas in no time if there is a unexpected guest.
This recipe I got it from one of our family cook and here goes the recipe.................

Ingredients


IngredientQuantity
Gram flour/kadalaimaavu3cups
Rice flour/arisimaavu3tbs
All purpose flour/maida3tbs
Red chilly powder/milai podi1tbs
Asafoetida/perungayam1/8tsp
Cooking soda1/8tsp
Turmeric powder1/2tsp
Salt11/2tsp


Method

                             Take all the measured ingredients in a wide bowl and mix it well using a spatula or put everything in a food processor and pulse it till everything gets mixed well.
Store it in an air tight container or a zip-lock bag.


  • It can be stored in the freezer for 6 months.
  • After mixing everything,you can sieve it in a strainer and store it.
  • If you want to use food color it should be added at the time of making the bajji or pakoda.Do not add in the mix while storing.
  • A tbs of cornflour can also be added and the amount of salt can be adjusted according to the personal preference.

Cauliflower Bajji or Pakora using the Homemade Mix

Making the bajji or pakora is very easy if the mix is handy and today's recipe is Cauliflower pakora as I don't have any other veggies.


Ingredients

IngredientQuantity
Cauliflower(florets)11/2cups
Bajji mix1/2cup
Food color(optional)a pinch
Wateras needed
Oilfor frying
Method
  • Put the cauliflower florets in the boiling water for a minute with a pinch of salt and drain it,keep aside.
  • Take the bajji mix,food color in a bowl and add water and stir it with a whisk or spoon and make a batter without lumps.
  • Heat a wok or pan with oil,once the oil becomes hot dip one floret in the batter and drop it in the oil,continue for the rest of the florets.
  • Fry it in the oil till it becomes golden color or the sizzling sound stops.Remove it from the oil and drain it on a paper towel.
  • Serve it with ketchup or sauce of your choice.

Enjoy...........................

  • The batter should be in dropping consistency,it should not be too thick or thin.
  • Veggies of your choice can be used to make the bajji.
  • If the prepared batter is more,add the thinly sliced onion.green chillies,curry leaves and a pinch of salt and mix it well,fry it in the oil till it gets crispy.
Check out my blogger friends who are participating in Blogging Marathon#18.
Sumber http://www.naliniscooking.com