Saturday, April 28, 2012

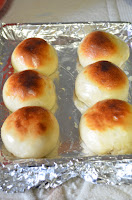
Thengai/Coconut stuffed buns

I am big fan of coconut bun which is available in the local bakery shop in my home town.I have been craving for some sweets since a week,to satisfy my sweet cravings made this coconut stuffed buns yesterday.It is a simple,easy to make bun and turned out good,we all enjoyed.
The weather was very bad,couldn't take more pictures.Somehow I managed to take very few clear pictures but I am not happy with that pictures,will update the picture when  I make next time.Now to the recipe.........  


Ingredients

For the outer dough 

IngredientQuantity
All purpose flour/Maida2cups
Yeast(rapid rise)11/2tsp
Milk1/4cup
Oil2tbs
Salt1/2tsp
Baking powder1/8tsp
Sugar11/2tbs
Water1/2cup
Butter2tbs

For the filling
IngredientQuantity
Coconut(grated)1cup
Sugar3/4cup
Milk1/4cup
Tutty frutty2tbs
Cardamom powder1/2tsp
Butter or ghee2tsp


Method

                 Activate the yeast by adding to the warm water,mix in sugar and milk.keep it in a warm place to get frothy.
Mix in all the ingredients along with the yeast mixture to form a soft dough.Keep it in a warm place to raise for atleast an hour.
Meanwhile prepare the stuffing,heat a pan with butter or ghee.Saute the coconut till the aroma comes out,add in the sugar and mix it well it become thick.Finally add the tutty frutty and cardamom powder,stir it well.Turn off the stove.
After an hour the dough would have doubled in size,punch down the air and divide into equal portions.Take one portion and press it gently,keep 2 tsp of the prepared stuffing and cover it by pulling the edges to the center and roll it gently in between the palms to get a nice and smooth buns.
Keep it on a greased baking tray,continue the same for the rest of the dough.Cover the baking tray with a wrap and let it sit for 30 minutes.After 30 minutes brush the top with milk or butter and bake it in a preheat the oven at 350 degree Fahrenheit for 20-25 minutes(mine took 20 minutes) till it becomes golden color.Once it is done take it from the oven and transfer the buns to a cooling rack and apply some butter.
Serve it as breakfast,brunch or snack.

  • Instead of white sugar brown sugar can also be used.
  • Using the tutty frutty is optional but it gives crunchy texture to the stuffing.
  • Finely chopped cashews can also used for the stuffing along with the coconut.
Enjoy.................

Check out the marathoners in Blogging Marathon#15 here.
Sumber http://www.naliniscooking.com

Friday, April 27, 2012

Brown Rice Aappam


Aappam is a traditional breakfast item of South India especially in Tamil Nadu and Kerala served along with coconut milk,kurma or any spicy curry.Aappam can be made in both salty and sweet version  made out of fermented batter with a combination of raw rice,idly rice and urad dhal.

Due to health conscious,started using brown rice but our taste buds not let us to eat as a substitute for regular rice.So trying to use in idly,dosa,adai and other tiffin items instead of regular rice.One such try is aappam which came out perfect,served along with kurma and everybody liked it.Here is the recipe.......


Ingredients

IngredientQuantity
Brown Rice 2cups
Rice flakes/aval1/4cup
Raw Rice1/4cup
Urad Dhal1/4cup
Fenugreek seeds/vendhayam 1/2tsp
Coconut(grated)2tbs
Saltto taste
Cooking Soda1/4tsp

Method


  • Take one cup of rice and cook it in the cooker without water and rinsing for 10 minutes to make the rice boiled.
  • Soak together the boiled rice and raw rice along with fenugreek seeds,urad dhal,rice flakes for atleast 6-7 hours.
  • Grind everything together to a fine paste,finally add the grated coconut and grind it for a minute or two.
  • Mix salt to the ground batter and allow it to ferment for minimum 10 hours or overnight.
  • At the time of making aappam,add water and make the batter to a slightly thin consistency(thinner than dosa batter).
  • Heat a appam pan or wok,pour a ladle full of batter in the center of the pan,gently swirl the pan so that the batter coats the sides of the pan.
  • Let the remaining batter in the center(as shown in the picture),cook it covered in a medium flame,till the sides get crisp and the center gets cooked.Once it is done take out from the pan and serve it.
  • Serve it with coconut milk or kurma.


Enjoy.....................
  • Out of 2 cups brown rice one cup can be either substituted with idly rice or raw rice.
  • While pouring the batter in the aappam pan,the pan should be hot,after swirling keep it covered in a medium flame. 
  • It is very important to soak so  atleast 6-7 hours or overnight as brown rice takes long time to soak.
  • As this aappam is made of brown rice it won't look as white color as the regular aappams.
Check out the marathoners in Blogging Marathon#15 here.
Sumber http://www.naliniscooking.com

Thursday, April 26, 2012

Sweet Paniyaram


I have already posted the masala paniyaram (savory version),wanted to make the sweet version with palm sugar(karupatti).Unfortunately the palm sugar what I got was not good and finally ended up in making it with jaggery.
Both the savory and sweet version of paniyarams are served for breakfast in our house holds,but we feel it heavy for breakfast so serve this for dinner or evening snack.
Today is day 3 of blogging marathon under the theme fermented food and here goes the recipe..........


Ingredients

IngredientQuantity
Idly rice/Pulungal arisi 1cup
Raw rice/Pacharisi1cup
Urad dhal1/4cup
Fenugreek seeds/Vendhayam1tsp
Jaggery 1/2-3/4cup
Gheeas needed
Salta generous pinch
Baking soda 1/8tsp
Coconut(grated) 2-3tbs(optional
Cardamom/Ellakai powder1/2tsp


Method 

                     Soak the rice,dhal and fenugreek seeds for atleast 3-4 hours and grind it to a smooth batter with salt.Ferment the batter for 8-10 hours or overnight.
  • Melt the jaggery with 1/4 cup of water,pass it through a strainer and add it to the batter.Add in the grated coconut,cardamom powder,baking soda to the batter.
  • Mix it well,heat the paniyaram pan,add 1/2tsp of ghee in each hole and keep it in a medium flame.
  • Drop in the batter to 3/4 of each hole and cook it covered for a minute or two in a medium flame.Flip it to the other side and cook it till it gets browned.Remove it from the pan.

  • Paniyaram is ready to serve.

Enjoy.........................

  • Cooking the paniyaram in a medium flame is very important to get a nice brown color.
  • Adding the coconut is optional but gives a nice flavor and taste to the paniyarams.
  • The consistency of the batter should do slightly thinner than dosa batter.
  • Frying in the ghee gives a nice flavor and richness to the paniyaram,if you are calorie conscious then mix a tsp of ghee with the oil. 
  • The amount of jaggery depends on personal preference,I used 3/4 cup as we both have sweet tooth.


Sumber http://www.naliniscooking.com

Wednesday, April 25, 2012

Wheat Butter Naan

Naan is a leavened Indian flat bread which is traditionally made in Tandoor oven in different flavors such as garlic and herbs.UsualIy for naan,all purpose flour is used,but to make it healthy,today I made it with wheat flour on the stove top and served along with paneer tikka masala.Now on to the recipe......

Ingredients


IngredientQuantity
Wheat Flour2cups
All purpose flour/Maida1cup
Yeast(rapid rise)1tsp
Milk1/4cup
Curd1tbs
Oil2tbs
Salt11/2tsp
Baking sodaa pinch
Baking powder1/8tsp
Sugar1tsp
Water1/4cup
Butter(for brushing)as needed


Method

               Activate the yeast by adding in a luke warm water with the sugar,milk and keep it for 5 minutes,till the mixture gets frothy.
Meanwhile add oil,curd,salt,baking soda,powder and to the flour.Mix it with milk and yeast mixture little by little to form a dough.Use milk or water as needed for kneading.Grease the palms with oil and knead the dough for atleast 5 minutes.

The dough should be soft and piable,cover it with a plastic wrap and keep it in a warm place for 1-2 hours to raise(turned on the oven light and kept inside).After an hour or two take out the dough and it would have doubled in size,punch down the air and knead it for a while.
Divide the dough into equal portions.Take one divided portion on a floured surface and press it gently,roll into a oblong shape using a rolling pin.Brush the top of the surface with water.
Heat the heavy bottom griddle,place the wet side on the bottom of the griddle and cook it covered for a minute in a medium flame.Flip it to the other side and cook it till the spots appear.Brush it with butter both the sides.
Serve it with the curry of your choice.

Enjoy.............................

  • The griddle should be  really hot while placing the wet side of the naan on the griddle.
  • If you are using garlic or herbs,gently press it before brushing the water.
  • If you are using a gas stove,after one side cooked you can directly put on the wire rack on a flame.

Check out the marathoners in Blogging Marathon#15 here.


Sumber http://www.naliniscooking.com

Tuesday, April 24, 2012

Kelvaragu/Ragi/Finger Millet Idly


This is a very simple,healthy breakfast which is easy to make with a slight variation from regular Idly.It's my grand mother's recipe and used to grind the whole soaked ragi grain,as I don't get the whole ragi grain here,mixed the ragi powder along with the rice and urad dhal.

Today is the 1st day of Blogging Marathon#15 under the theme Fermented Foods and follows the recipe for the healthy Idly.......

Ingredients

IngredientQuantity
Idly rice/Pulungal arisi 11/2cups
Rice flakes/aval(optional)1/4cup
Finger Millet/Ragi Powder1cup
Urad Dhal1cup
Fenugreek seeds/vendhayam 1/2tsp
Saltto taste


Method
  • Soak the rice,rice flakes for atleast 4-5 hours separately and soak the urad dhal and fenugreek seeds for an hour.
  • Grind the urad dhal fluffy with water as needed then grind the rice little bit coarsely(fine rava like).
  • Mix well the ground Urad dhal,rice and ragi powder along with salt.
  • Allow it to ferment for 8-10 hours or overnight.
  • Grease the idly plate with oil and pour the fermented batter in the greased idly plate.
  • Steam in the  cooker or Idly cooker for 10-12 minutes or until done.
  • Soft and spongy ragi idlis are ready. 
  • Serve it with spicy chutney or chutney of your choice.
    Enjoy................

    • Adding the rice flakes is purely optional,it gives a soft texture to the idly.
    • Grinding the rice to fine rava like consistency is very important otherwise the idly will turn out sticky.
    • Spicy chutney is the best accompaniment for this idly.
    Check out the marathoners in Blogging Marathon#15 here.

      Sumber http://www.naliniscooking.com