Monday, December 10, 2012

Panasa Thonnalu-A traditional Andhra Sweet

Panasa Thonnalu is a traditional Andhra  festive sweet which is in a jackfruit bulb shape.Panasa thonalu means jackfruit bulb in Telugu and in some places it is called as Flower Kaja
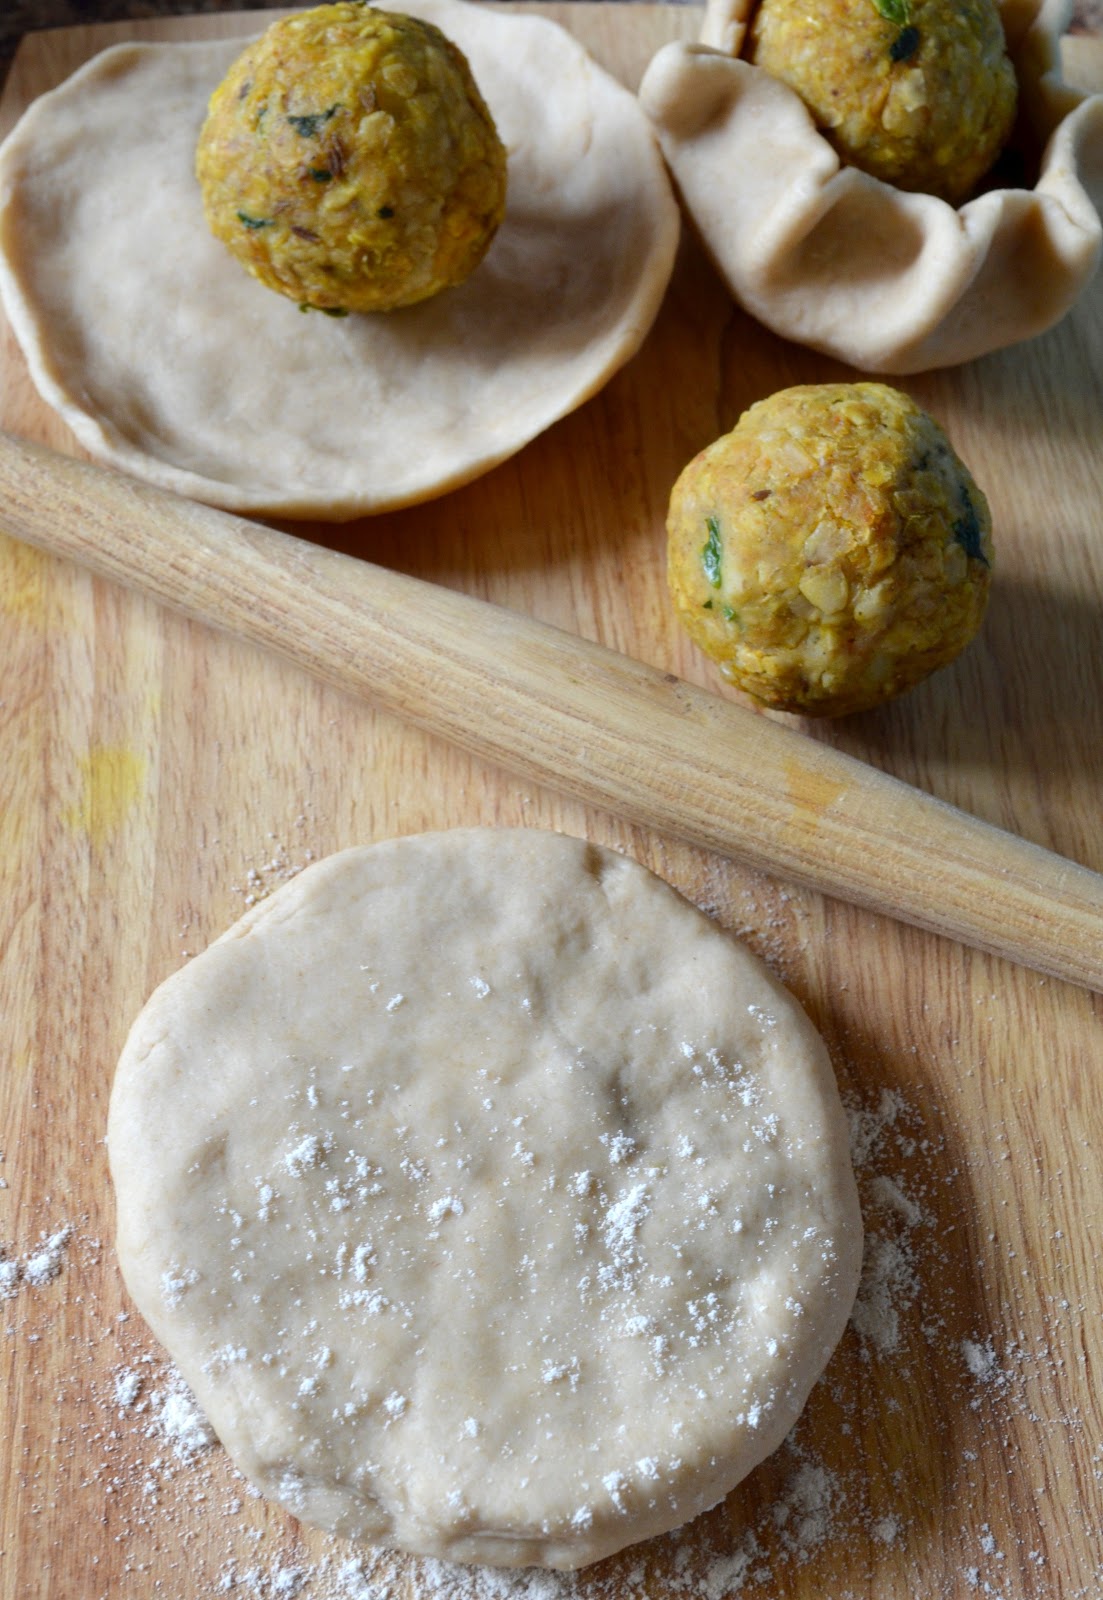
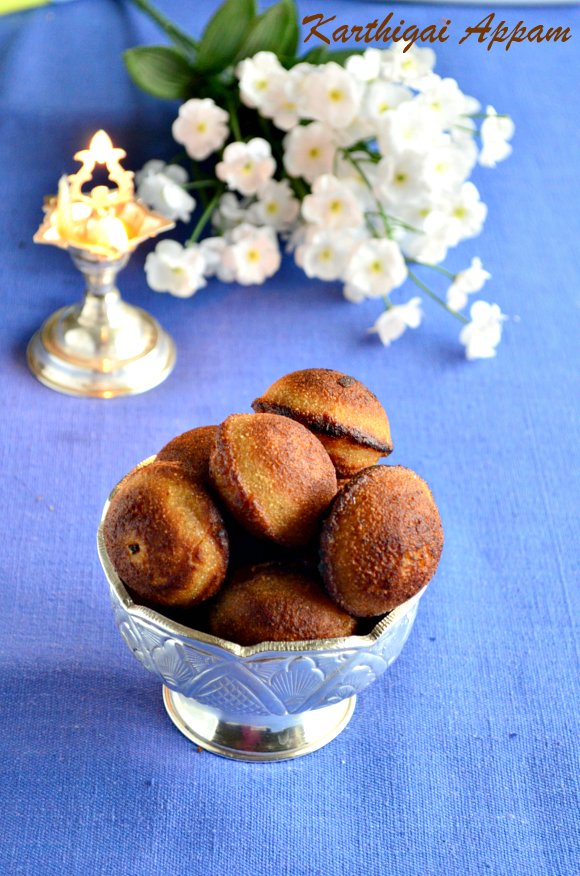
This is a very simple and easy to make sweet in which a poori is made out of the dough,cut and shaped into a jackfruit bulb.Then it is deep fried in the oil and dipped in the sugar syrup.
I had this sweet very first time in one of my friends palace and her mom made this delicacy.It was so delicious and liked the shape of the sweet which is very new to me.
When I made this sweet for first time something went wrong with the sugar syrup consistency and used little amount of ghee,it was not crispy.I tried couple of times after my first trial and it came out perfect.Here goes the recipe ................
Ingredients

IngredientQuantity
Maida/All purpose flour11/2cup
Ghee/nei 3tbs
Salt1/8tsp
Sugar11/2cups
Cardamom powder/ellakai1/2tsp(optional)
Oilfor frying


Method

                           Take maida in a bowl,to this add the salt and ghee.Mix it with the fingers till it becomes crumbly.Gradually add water to this and a make a firm dough and keep it aside.
Meanwhile mix the sugar with 1/2cup of water and cook it in a medium flame till it reaches single thread consistency and set it aside.Divide the dough into small ball(size of gooseberry) and roll into a thin poori.Now with a sharp knife into strips leaving both sides intact (as shown in the picture).
Gently roll the poori from one edge and twist the sides and keep it on a plate.Heat the oil in a medium flame and fry 3-4 pieces in the oil it becomes crisp and golden color.
Remove it from the oil and drain it on a paper towel.Once it becomes cool down drop it in the sugar syrup and keep it on a plate to get the crystallizes.
Store it in an air tight container.
Enjoy....................................

  • Roll the poori as thin as possible to get a crispy panasa thonnalu.
  • Do not keep the shaped panasa thonnalu for a long time as it tends to stick and it doesnot hold the shape.
  • After dropping the oil the size will expand so be fry only 3 or 4 pieces at a time.
  • If the sugar consistency becomes thick after cooling add a tbs of water and heat it again.
  • Instead of dropping it in the sugar syrup powdered sugar can be sprinkled as soon as take out from the oil.
  • After dipping it in the sugar syrup arrange it on a plate in a single layer,do not stack it otherwise it will stick to each other.


Sumber http://www.naliniscooking.com

Wednesday, December 5, 2012

Oats and Potato Stuffed Paratha

My family is a stuffed paratha loving family so I always try different stuffing to satisfy our taste buds.Whenever I make paratha for my son's lunch box,try to add some nutritive ingredient to make it more healthier.
Last week when I was making aloo paratha for him just got the idea of adding oats to the stuffing along with some spices and the end result is a tasty and delicious,healthy paratha.Now off to the recipe.........  

Ingredients

For the Paratha
IngredientQuantity
Wheat flour2cups
Oil or ghee2tsp
Salt1tsp
Water to kneadas needed
For the Stuffing


IngredientQuantity
Oats11/2cups
Potato(boiled and mashed)1no.(medium size)
Chilly powder1tsp
Aamchur powder1tsp
Turmeric powder 1/2tsp
Green Chilly(chopped)2nos.
Coriander leaves(chopped)2tbs
Cumin seeds1tsp
Ginger(grated)1tsp
Saltto taste
Oilas needed


Method

  • Mix the ingredients given to make paratha in a wide bowl and mix well with water as needed to a soft dough and set it aside.Boil the potato in the pressure cooker and mash it or grate with carrot grater. 
  • Heat the pan with 2tsp of oil and crackle the cumin seeds then goes in the green chilly and grated ginger. Now add the mashed potato,oats and sprinkle 2tbs of water,give it a mix.Then put in the chilly powder,turmeric powder,aamchur powder and salt.Stir it well,let it cook for a minute or two.Finally add the coriander leaves and mix it well.
  • After cooling divide into equal portions and also divide the dough into equal portions.
  • Flatten the dough into 3' disc and keep the stuffing and seal it.Then roll into a paratha of desired thickness on a floured surface.
  • Cook it on a hot griddle both sides till it cooks and drizzle a tsp of oil or butter or ghee according to your preference.
  • Serve it raitha or pickle or curry of your choice.

Enjoy................................
  • Do not sprinkle too much of water,otherwise the fill may turns out mushy.

Sumber http://www.naliniscooking.com

Monday, November 26, 2012

Karthigai Appam/Rava Paniyaram/Appam

This is a simple and easy to make appam or paniyaram which is made for Karthigai Deepam in my in laws place.My mom makes Karthigai appam with soaked raw rice which I  share later whereas this is an instant method of making appam which doesn't need any grinding except the soaking time.Originally it is deep fried in ghee but to make it more healthier instead of deep frying I make it in paniyaram pan and used wheat flour instead of all purpose flour.In some places it is made like a thick pancake in a griddle with ghee.Now on to the recipe....

Ingredients

IngredientQuantity
Wheat flour1cup
Rice flour1/4cup
Semolina/rava/sooji1cup
Coconut(grated)3tbs(optional)
Cardamom/ellakai Powder1tsp
Jaggery/vellam1cup
Milk11/2cups
Salta pinch
Baking soda1/8tsp
Gheeas needed


Method

  • Mix in wheat flour,semolina,rice flour and add the milk.Let it soak for an hour.
  • Add 1/4 cup of water to the jaggery, make the syrup and pass it through the strainer to remove the impurities. Now mix in the sugar syrup to the soaked mixture.Add in the cardamom powder,salt,baking powder, grated coconut and mix it well.
  • Heat a paniyaram pan and add 1tsp of ghee to each hole,once the ghee becomes hot fill each hole with the batter.
  • Cook it in a medium flame till golden color and flip it to the other side.Cook it for a minute and remove it from the pan.
  • Appam is ready.
Enjoy....................................................

  • The batter should be in pouring consistency,if it is not add little more milk and adjust the consistency.if the the batter is too thick the appam will be hard.
  • Adding grated coconut or coconut bits is purely optional  original recipe doesn't have it but can also be added for extra taste and flavor.
  • Instead of jaggery sugar can be used and the soaking time is important to get  fluffy and soft appams. 
  • Be generous with the ghee to get a tasty appams.

Sumber http://www.naliniscooking.com

Tuesday, November 20, 2012

Pavakkai/Pakarkkai/Bittergourd Podi

Pakarkkai podi is a slightly bitter,tangy mouthwatering  podi which an be mixed along with the rice or served as an accompaniment for curd rice.
I got this recipe from a T.V show and tried this one and it came out so delicious and tasty.Since then I started it making it frequently.This podi can be made with readily available ingredients and stored in room temperature for a week,now to the recipe.......

Ingredients


IngredientQuantity
Bittergourd/pavakkai5nos.
Coconut(grated)1/4cup
Red chilly8-10nos.
Shallots/chinna vengayam6nos.
Cumin seeds/jeergam2tsp
Tamarind/puligooseberry size
Salt2tsp
Oil4tbs
Mustard seeds/kadugu1tsp
Curry leaves/karivepillai2sprigs


Method

                     
                      Grate or coarsely grind the bittergourd and add a tsp of salt and keep it for 30 minutes.After 30 minutes squeeze the excess water and keep the bittergourd aside.
Heat the oil and crackle mustard seeds and curry leaves then add the bittergourd.Fry it until it turns light brown,stir in between every two minutes to prevent burning.
Meanwhile grind coarsely coconut,small onion,red chillies,tamarind and cumin seeds without adding water.Add it to the fried bittergourd and salt,cook it in a medium heat until it turns brown and crumbly.
Bittergourd podi is ready.Store it in a container.

  • Squeeze the grated bittergourd completely to remove the excess moisture.
  • Fry the grated bittergourd in a medium flame to prevent burning.
  • After adding the ground coconut fry it in a low flame and stir in between. 
  • Use the fresh tamarind not the paste otherwise it won't become dry.
  • Instead of grating the bittergourd in a grater use a chopper or pulse it in a blender to make it quicker.


Sumber http://www.naliniscooking.com

Tuesday, November 13, 2012

Maida Biscuits

                            
      Wishing You all Happy and prosperous Deepavali


Maida biscuit is one of my childhood favorite and we call this as chappathi biscuits since the dough is rolled into a chappathi and cut it to a desired shape.My mom makes this one for snack when we were kids and myself and my sister used to help to cut the biscuits in different shapes.This biscuits can be added to the mixture also.Here is the recipe...........

Ingredients


IngredientQuantity
Butter/vennai1/2cup
Sugar1/2cup
Milk1/3cup
Baking sodaa generous pinch
Salt1/8tsp
All purpose flour/maida31/2-4cups
Oilfor frying

Method

  • In a wide bowl take the butter,sugar,baking soda,sugar and rub it till it becomes creamy.
  • Now add the milk and mix it well,to this add the all purpose flour and knead it to a dough.
  • The kneaded dough should be in a poori dough consistency.Divide the dough into equal portions.
  • Roll the divided portion into a 1/4inch chappathi and cut it into diamond or square shape.
  • Spread the cut diamonds in a plate or paper and dry it for 5 minutes,then deep fry it in the oil in a medium flame till it becomes golden color.
  • Maida biscuit is ready.
Enjoy...............................................

  • The amount of maida given is approximate it can be added till the dough gets thick(for me it took 33/4 cups)
  • While frying in the oil turn one or two times only otherwise the biscuits will break.
  • The biscuit needs to be fried in a low to medium flame otherwise it will turn brown without cooking.
  • If the kneaded dough is not thick the biscuits will absorb more oil.
  • Instead of butter,vegetable shortening such as vanaspathi can also be used.The biscuits will not be crispy when it is hot but after cooling it will be crunchy and soft.


Sumber http://www.naliniscooking.com

Thursday, November 8, 2012

Rava Urundai/Rava Ladoo

Hello friends I am back after a small break and settling down to the new routine.Hope everyone is getting ready for Deepavali.
Before getting into the recipe I would like to share that my blog has reached 1 lakh hits last month and like to convey my heartfelt thanks to my blogger buddies,friends and readers.
Coming to the recipe rava urundai is a simple and easy to make sweet which can be made in a jiffy.
For every Diwali my mom makes rava urundai and pasiparuppu urundai(recipe coming soon) since its our family's favorite.But after marriage I tried couple of times and it didn't come out as good as my mom makes.As my mom is here for this Diwali I wanted to learn from her.
My mom makes two versions of rava urundai one is with the coconut and the other one without coconut which has a longer shelf life.Today's recipe is the later one and here goes the recipe.........

Ingredients

IngredientQuantity
Rava/Semolina1cup
Sugar1cup
Ghee/nei5tbs
Cashews/mundiri(broken)2tbs
Cardamom/ellakai 4nos.
Method

                            Fry the cashews in a tsp of ghee and keep aside.In the same pan roast the rava in a medium flame till the aroma comes.Once it cools down powder the rava and cardamom in a blender or mixie to a fine powder and set aside.
Now take the sugar and powder it to a fine powder.In a wide mixing bowl mix both the powdered rava and sugar,add the fried cashews and mix it well.
Meanwhile melt the ghee and add it to the powder,mix it well,at this stage the mixture looks crumbly.Take a small amount of mixture in the palm and make a small ball.
Easy to make rava urundai/ladoo is ready.

Enjoy...........................................................

  • While adding the ghee to the mixture it should be hot.
  • If  your are not able to make the balls add couple of tbs of warm milk to the mixture but the shelf life will be less if milk is used.
  • Powder the rava to a fine powder and do not over roast the rava otherwise the color will change.
  • When you are making larger quantity add the hot ghee for a small amount of mixture and make the balls.

Sumber http://www.naliniscooking.com