Sunday, September 4, 2016

Cone Dosa and Ghee Roast


We are entering the second week in Food Cranival mega Blogging Marathon edition.As I already metioned in my themes,this week is going be fermented dosa varieties.
For this day,I am sharing the ever popular plain dosa shaped into a cone and ghee roast.
As my kids love to have dosa and idly I make the batter often and store it in the refrigerator.I usually make dosa with one day older idly batter and it comes out super crispy and delicious.But sometimes I grind it separately for dosa when I have parties and follow the given measurements.
With this batter I will share the variations in the following themes.
The photos for the final picture and the step wise are taken in different days as clicking the dosa pictures are real big task for me.Off to the recipe....................


                                                Cone Dosa and Ghee roast Dosa


   Basic Information

   Preparation time 35- 40minutes
   Soaking time 3-4 hours
   Fermentation time 8-10 hours
   Cooking time 2-3 minutes/dosa
   Makes 12-14 dosas


  Ingredients


Ingredient
Quantity
Idly rice or pulungal arisi
2 cups
Raw rice/pacharisi
1/2 cup
Urad dhal/uluthamparuppu
1/2 cup
Rice flakes/aval
2 tbs
Fenugreek seeds/vendhayam
1 tsp
Salt
2.5 tsp
Ghee/nei
as needed
to cook dosa
Water to adjust the
consistency of batter


 Method

  • Soak  both rice and rice flakes together for 3-4 hours.Soak the urad dhal separately along with fenugreek seeds. Drain the water completely in both rice and urad dhal.Now grind the urad dhal separetly in a blender or wet grinder till its fluffy and fine paste.Transfer it to a bowl.Then grind the rice to a fine paste with water as needed.
  • Now mix both the ground  rice and urad dhal well with hand along with the salt.Keep it in a warm place for 8-10 hours or overnight for fermentation
  • Next day or after the fermetation mix the batter well and take the required amount of batter to make dosa.Adjust the consistency with water.
  • Heat a griddle and one it becomes hot ,add a drop of oil and wipe it off with a paper and keep the flame in medium.Pour a ladleful of batter and spread it into a circle as thin as possible.
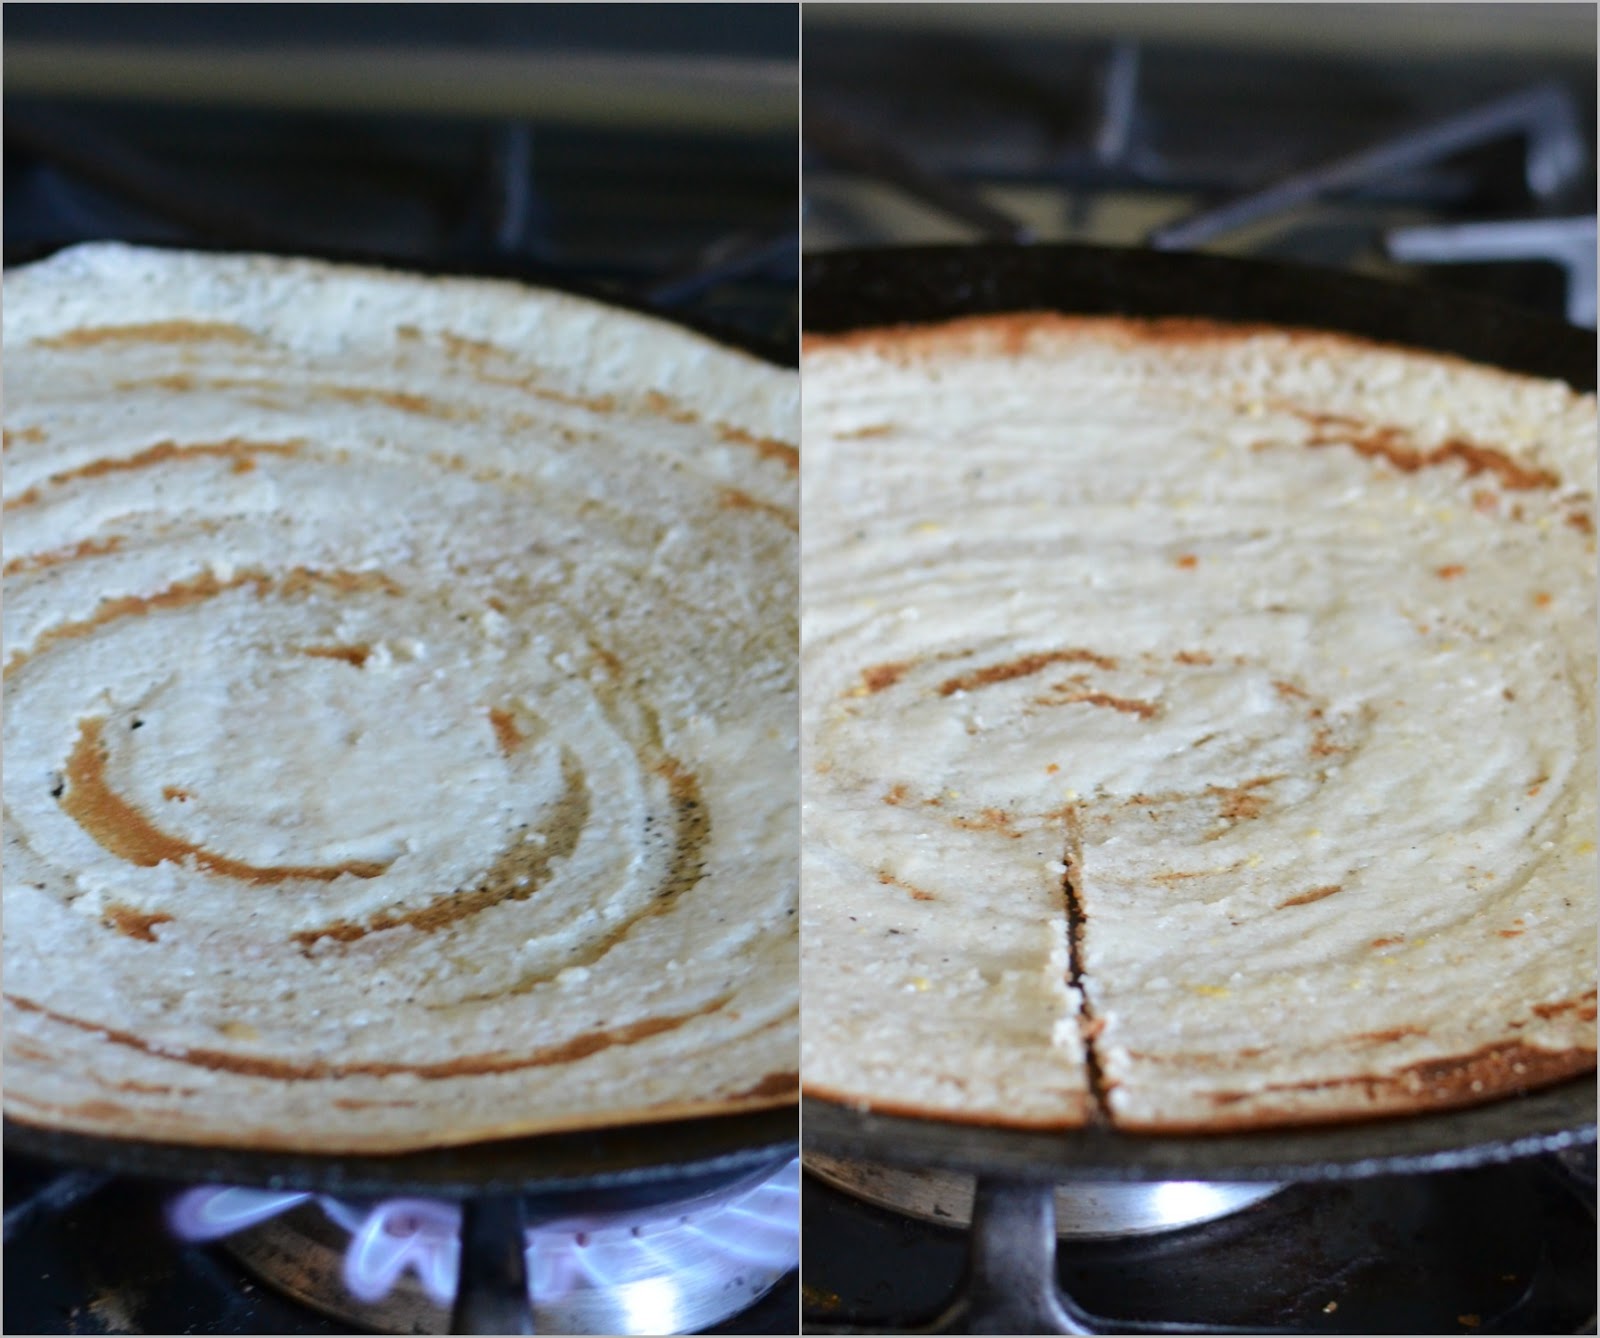
  • Drizzle a generous spoon of ghee and cook it in a medium flame.Once the dosa gets cooked keep ii in a high flame for 30 seconds to get crisp and brown.
  • Now loosen the edges with the spatula,fold it and remove from the pan.
  • To make the cone dosa after the dosa gets crisp and golden,with the help of spatula mark a line in the circle from the center to one end as shown.
  • Fold it from one side and roll it to a cone.
  •  Serve it  with  coconut and spicy chutney,sambar.  


  • The batter consistency is very important to get a nice dosa.If you are sure with consistency then do a trial dosa and adjust it.
  • While pouring the batter on the griddle,the flame should in medium.Then only it will be easy to spread as thin as possible.
  • Use a flat base ladle to spread the dosa.
  • A perfect fermented batter is the key to get a nice golden crispy dosa.Also the addition of fenugreek seeds also.
  • I always keep my batter in the lighted oven overnight to get fermented properly.
  • In winter,I keep the batter in the oven for extra 2-3 hours for the fermentation.
  • While making dosa if you feel the griddle is so hot then sprinkle some water to get it cool down.
  • I use iron pan to make dosa,if the dosa sticks and not coming properly then slice an onion and rub it on the dosa pan with few drops of oil.This step can be followed for each time after removing the dosa from the pan.


Enjoy............................


Check out the Blogging Marathon page for the other Blogging Marathoners doing BM# 68


Sumber http://www.naliniscooking.com

Friday, September 2, 2016

Carrot Dosai/Carrot Dosa


Today is the final post for the colored dosa,themed in Food Carnival in Mega Blogging Marathon.
As my kids hesitate to eat veggies I sneak in some of their favorite food.Since dosa is their favorite I try to sneak the veggies as much as possible.
Coming to the recipe,this is a simple and healthy dosa can be made instantly.Need to soak the rice for few hours and grind to a fine paste.The same recipe can be followed for beetroot dosa too.Off to the recipe.....


                              Carrot Dosai/Carrot Dosa


   Basic Information

   Preparation time 20 minutes
   Soaking time 2-3 hours
   Cooking time 15-20 minutes
   Makes 8  dosas


  Ingredients


Ingredient
Quantity
Idly rice or pulungal arisi
3/4 cup
Raw rice/pacharisi
1/2 cup
Rice flakes/aval/poha1/4 tsp
Carrot (grated)
3/4 -1 cup
Red chilly/varamilagai
2-3
Tamarind/puli
blueberry size
Cumin seeds
1 tsp
Salt1.25 tsp or to taste
Oil
2-3 tbs(to cook dosa)
Water
as needed
Coriander leaves(optional)
1 tbs


 Method

  • Soak  both rice and rice flakes together for 2-3 hours.After its soaked drain the water completely  and  grind  to a fine paste with water as needed.Now grind the grated carrot,salt,red chilly,tamarind and onion to a fine paste with water.
  • Mix both ground rice and carrot paste well .Adjust the consistency of the batter with water.The consistency should be slightly watery.Heat the griddle and add few drops of oil and wipe it off with the paper.Pour a ladleful of batter in the center.Spread it as thin as possible.
  • Drizzle a tsp of oil and cook it in a medium flame.After a minute or two,flip the dosa to the other side and cook .Drizzle one more tsp of oil if needed.Remove it from the pan.
  •  Serve it  with  tomato chutney  or spicy chutney.


  • The batter consistency is very important to get a nice dosa.If you are sure with consistency then do a trial dosa and adjust it.
  • Flip the dosa and cook it for a minute even if its cooked.
  • While pouring the batter on the griddle,the flame should in medium,then increase the flame  and cook it.
  • A tbs of soaked channa dhal is also added to the ground batter along with chopped coriander leaves.


Enjoy....................................


Check out the Blogging Marathon page for the other Blogging Marathoners doing BM# 68


Sumber http://www.naliniscooking.com

Thursday, September 1, 2016

Karivepillai Dosai / Curryleaves Dosa


Coming to day 2 themed under colorful dosa is a pale green colored dosa made with curry leaves.Back in India my mom used to make a dosa with ballon vine(mudaikatahn keerai).Some times curry leaves can also be added along with it.Since I don't get ballon vine here,made it only with curry leaves.
The dosa came out so well with the flavor of curry leaves and cumin,pepper.This dosa tastes good when it is straight from the pan.It turns slightly hard when its cool down.So I personally prefer to have it when its is warm.Both coconut chutney and spicy chutney goes well with this dosa.Off to the recipe.................


                                    Karivepillai Dosai/Curry leaves Dosa


   Basic Information

   Preparation time 20 minutes
   Soaking time 2-3 hours
   Cooking time 15-20 minutes
   Makes 8 dosas


  Ingredients


Ingredient
Quantity
Idly rice or pulungal arisi
1 cup
Raw rice/pacharisi
1/4 cup
Curryleaves/karivepillai
3/4 cup
Red chilly/varamilagai
2-3
Tamarind/puli
blueberry size
Cumin seeds
1 tsp
Black pepper/milagu1 tsp
Turmeric powder/manjal podi
a pinch
Salt
1.25 tsp or to taste
Oil
as needed
Water
as needed


 Method

  • Soak  both rice together for 2-3 hours.After its soaked drain the water completely  and  grind  to a fine paste with water as needed.Now grind the curry leaves,salt,red chilly,tamarind into a fine paste with water.
  • Mix both ground rice and curry leaves paste well .Meanwhile coarsely grind the cumin and pepper,add it to the batter.
  • Adjust the consistency of the batter with water.The batter should in rava dosa consistency.Heat a griddle and one it becomes hot pour a ladleful of batter in a circular motion from outside to inside.Fill in the gaps with the batter.

  • Drizzle a tsp of oil and cook it in a medium flame.After a minute or two,flip the dosa to the other side and cook .Drizzle one more tsp of oil if needed.Remove it from the pan.
  •  Serve it  with  coconut and spicy chutney  


  • The batter consistency is very important to get a nice dosa.If you are sure with consistency then do a trial dosa and adjust it.
  • Flip the dosa and cook it for a minute even if its cooked.
  • While pouring the batter on the griddle,the flame should in high,then keep it in a medium to cook evenly.


Enjoy....................................


Check out the Blogging Marathon page for the other Blogging Marathoners doing BM# 68


Sumber http://www.naliniscooking.com

Wednesday, August 31, 2016

Kanchipuram Dosai/Kancheepuram Dosa


We are entering September month and its going to be food and fun filled month for our Blogging Marathoners.
Some of my readers know that I participate in a monthly event blogging marathon,3 days for 4 weeks.Since April 2013 we are doing a mega marathon for the month of April and September with interesting themes.
Though I participated in all the April mega marathons,some how not able to participate in September marathon due to several reasons.But this year I am participating in September marathon too.
Every mega marathon there will be a nice and innovative theme to showcase our delicacies.
This year September theme,is named as Cooking Carnival and theme is  very interesting and we have options to 

                      1.Cook one ingredient for 26 days or one category for 26 days
                      2.Cook with one ingredient for each week or category for each week

I choose to share dosa varieties as one category for 26 days with sub themes for each week.I combined both the themes and sharing the recipes.


Coming to day 1 recipe,themed under colorful dosa is Kanchipuram dosa.I had this dosa in a restaurant during my India trip.After seeing the Kanchipuram dosa in their menu card I wanted to give a try,as it sounds new to me.
A soft and spongy yellow colored dosa was served in a big platter with 3 different types of chutney and sambar along with idly podi.
When I had the first bite it was melting in my mouth along with the cumin and pepper flavor.Though it was served with so many sides,I personally preferred to have it mint chutney.

When I decided to share dosa recipes for the theme,I wanted to share this dosa and started my hunting for the recipe.The batter recipe sounds more  like Kanchipuram idly with some variations.
So I decided to follow the same recipe with some changes.The output was a spongy dosa with pores and we loved it a lot.I served mine with mint chutney and kaara chutney along with idly milagai podi.Lets move on the recipe for Kanchipuram dosa......


                                    Kanchipuram/Kancheepuram Dosa


   Basic Information

   Preparation time 30 minutes
   Soaking time 3-4 hours
   Fermetation time 8-10 hours
   Cooking time 15-20 minutes
   Makes 10-12 dosa


  Ingredients


Ingredient
Quantity
Idly rice or pulungal arisi
1 cup
Raw rice/pacharisi
1 cup
Urad dhal/uluthamparuppu
3/4 -1 cup
Fenugreek seeds/vendhayam
1 tsp 
Salt
2 tsp or as needed
Yogurt/thayir
1/4 cup
Oilas needed to cook
the dosa


 For Tempering


Ingredient
Quantity
Cumin seeds/jeeragam
1 tsp
Black pepper/milagu
1 tsp
Ginger/inji(finely chopped)
1 tsp
Asafoetida/perungayam
a pinch
Curry leaves/karivepillai
few leaves
Turmeric powder/manjal podi
1/2-3/4 tsp
Ghee/nei
2 tsp
  
   Method 

  • Soak the dhal along with fenugreek seeds and rice separately for 3-4 hours.After its soaked drain the water completely for both rice and dhal.Grind the urad dhal in a mixer or wet grinder till fluffy.Then grind both the rice to a fine paste with water as needed.Mix both rice and dhal together and add salt.Mix it thoroughly and keep the batter it in a warm place for 8-10 hours to ferment.
  • After fermentation,mix the batter well and add the yogurt the batter.The batter should be in a pouring consistency.If needed add some water.Mix it well and set it aside.Now roughly grind the pepper and cumin and keep it aside.Heat a pan with ghee and once the ghee becomes hot add the ground pepper and cumin.Then add the curry leaves,chopped ginger,asafoetida and turmeric powder.Mix it well and put off the flame.

  • Add it to the batter and give it a mix so that everything blends well.Heat a dosa griddle and add a drop of oil and wipe it with a paper.Pour a ladle full of batter and gently shape it o a circle with the backside of the ladle.Do not spread it to a thin or big circle
  • Drizzle a tsp of oil and cook it covered in a medium flame.After a minute or two,flip the dosa to the other side and cook .Drizzle one more tsp of oil if needed.Remove it from the pan.
  •  Serve it  with chutney  and podi.


  • The batter needs to ferment very well to get a nice  and soft dosa with pores. .
  • Do not spread the dosa too thin.
  • Grind the urad dhal till it becomes fluffy.
  • Finley chopped cashews and green chillies can also be added in the tempering for extra rich taste.

Enjoy...............................


Check out the Blogging Marathon page for the other Blogging Marathoners doing BM# 68


Sumber http://www.naliniscooking.com

Monday, August 15, 2016

Mint Chutney/Pudina Chutney with Coconut


Today's recipe is a flavorful mint chutney with coconut.I have shared a version of no coconut version here.
Though I make this chutney often,never had a chance to click it for the blog.Last week I had lots of home grown fresh mint and made this chutney.This chutney is a perfect accompaniment for idly,dosa,rava dosa and paniyaram.This recipe I noted down from my mom when I came to U.S after marriage.Off to the recipe...............


                 Mint chutney/Pudina Chutney


   Basic Information

   Preparation time 10 minutes
   Cooking time 10 minutes
   Serves 4(generously)


  Ingredients


Ingredient
Quantity
Mint leaves/pudina
1 cup(tightly packed)
Coriander leaves/kothamalli
( finely chopped)
2-5 stems(optional)
Green chilly/pachamilagai
4-5
Coconut(grated)
5-6 tbs
Roasted gram dhal/pottukadalai
1 tsp
Cashews/mundiri
3-4
Turmeric powder/manjal podi
 a pinch
Tamarind/puli
a small gooseberry size
Salt
1 tsp or to taste
Oil
2 -3 tsp

 For Tempering


Ingredient
Quantity
Mustard seeds/kadugu
1/2 tsp
Urad dhal/u;utham paruppu
1/2 tsp
Asafoetida/perungayam
a pinch
Curry leaves/karivepillai
few leaves
  
   Method 
  • Heat around a tsp of oil in a pan,to this add the green chilly,mint and coriander leaves,saute it till the leaves change its color.Put off the flame,let it cool down. After cooling,take the green chillies,coconut,cashews ,salt and tamarind in a blender jar. Grind it to a coarse paste with water as needed.
  • Now add the mint leaves and grind it well.Transfer the ground paste to a bowl.Heat the rest of the oil in a small pan and do the tempering with the given ingredients and add it to the ground chutney.
  •  Serve it  with idly or dosa,paniyaram


  • The amount green chilly given here is for a bit spicier version.It can be altered according to personal preference. .
  • This chutney stays good for 2 days if it is stored in the refrigerator.

Enjoy................

This recipe is off  to Cook Book Challenge for August,Week#2.


Sumber http://www.naliniscooking.com

Friday, August 12, 2016

Chocolate Almond Clusters/Almond Chocolate Clusters


For the final day I made kids favorite almond chocolate clusters.These clusters can be made with any nuts,as my kids love almonds I made with it.
Here I used the semi sweetened chocolate and also topped it with kosher salt and sugar granules.Its purely optional.Also I melted the chocolate and toasted the almonds in microwave oven .White chocolate can also be used to make this yummy clusters.


                                                                                                                                                                                                    Almond Chocolate Clusters


   Basic Information

   Preparation time 10 minutes
   Cooking time 2-3 minutes
   Makes 10 -12 clusters


 Ingredients


Almonds/badam
1/2 cup
Semi sweetened Chocolate
1/3 cup
Sea salt
a pinch
Granulated sugar or raw sugar
1 tsp(optional)


 Method

  • Roast the almonds in a MW for 2 -3 minutes or till it becomes crisp.Let it cool down completely.Line a baking tray with parchment paper and keep it aside.
  • Now in microwave safe bowl add the semi sweetened chocolate and keep it for 1-1.5 minutes or till its melted.Mix it in between every 30 seconds.Once the chocolate is completely melted add in the toasted almonds.

  •  Mix it well and scoop up a spoonful of mixture and keep it on the lined baking tray.Let it sit on the counter for 1-2 hours or refrigerate for 30 minutes.Once the chocolate sets remove it from the paper. 
  • Store it in an air tight container.


  • Dark or white chocolate can also be used.
  • Instead of topping it with salt and sugar,white chocolate can be melted and drizzled on the top to give a nice look.
  • Toast the nuts to get a nice crunchy clusters.


Enjoy..........


Check out the Blogging Marathon page for the other Blogging Marathoners doing this BM#67

Sumber http://www.naliniscooking.com