Wednesday, May 1, 2013

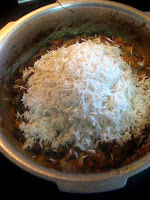
Rajma/Red Kidney Beans Biriyani


For the final day of blogging marathon #27 I am sharing you a healthy,protein packed biriyani with the red kidney beans/rajma.
The recipe I got it from a cookery show and the original recipe is with chickpeas/channa but for a change I tried it with rajma.Now off to the recipe..................................................


Ingredients

IngredientQuantity
Basmathi rice1cup
Rajma/red kidney beans(soaked)1cup
Onion(thinly sliced)2nos.(medium size)
Tomato(finely chopped) 2nos.(medium size)
Mint leaves(chopped) fistful
Coriander leaves(chopped)fistful
Yogurt/curd/thayir3tbs
Salt11/2tsp
Oil3tbs
Hot water11/2cups

To Grind

IngredientQuantity
Ginger/inji1inch pice
Garlic/poondu5 cloves
Green chilly2nos.
Red chilly powder/milagai podi 1tsp
Coriander powder/dhania podi 11/2tsp
Cloves/lavangam4-5nos.
Cinnamon/pattai1 inch piece
Cardamom 1no.


Method 

Cook the rajma in a pressure cooker for 2 whistles with a pinch of salt,it should not be mushy.Meanwhile grind the ingredients given to grind to a fine and smooth paste.Soak the basmathi rice in water for 20 minutes.

Start by heating the pressure pan with oil and saute the onion till translucent then add the ground paste.Saute it till the raw smell disappears.

Now add the yogurt/curd,chopped mint and coriander leaves,saute it for a minute.Then add the cooked rajma and mix it well.

At this stage add the chopped tomato,salt and cook it mushy.Add the rice and fry it for a minute.


Add the hot water.Let it boil,close the pan and cook it for one whistle in a medium flame.Then keep it in a low flame for 5 minutes.Remove the lid,once the pressure subsides and fluff it with a fork.

Rajma biriyani is ready.Serve it with raita.


Enjoy...................................................


  • Do not cook the rajma for a long time otherwise it will turn mushy.
  • Instead of cooking it in a pressure cooker,it can be cooked in an open pot also.
Check out my fellow bloggers participating in Blogging Marathon#27.
Also linking to Only-Legumes event happenings my space started by Pari of Foodelicious.

Sumber http://www.naliniscooking.com

Tuesday, April 30, 2013

Green Peas and Cabbage Vada


Today I am sharing you a recipe from my friend Sangee's space and made this for the first time.The vadas came out crispy and tastes excellent which is perfect for evening snack or a party starter.Here goes the recipe...........................................


Ingredients

IngredientQuantity
Green peas/pattani11/2cups
Channa dhal/kadalaparuppu1/4cup
Green chilly4-5nos.
Garlic/poondu 4 cloves
Ginger/inji 1 inch piece
Fennel seeds/sombhu(chopped)11/2tsp
Coriander leaves(chopped)2tbs
Cabbage(shredded)1/2 cup
Onion(finely chopped)1no.(medium size)
Saltto taste
Oilas needed for frying


Method
  • Soak the green peas for 7-8 hours or overnight and channal dhal for 2 hours.Drain the water completely after soaking.
  • In a mixie jar take the ginger,garlic,green chilly,fennel seeds and the soaked peas,pulse it for a minute.Now add the soaked channal dhal and grind it coarse.
  • Transfer the ground paste to a bowl,to this add the chopped onion,curry leaves,coriander leaves and shredded cabbage,mix it well.
  • Heat the oil in a medium flame.Take a small lemon size ball of batter and flatten in between the palms and drop it in the oil.
  • Fry it till both the sides get golden and crisp,drain it on a kitchen towel.
  • Serve it with ketchup.

Enjoy...............................................


  • Do not grind the batter to a fine paste,it should be little coarse to get a nice crispy vadas.
  • Add 2 tbs of soaked channa dhal without grinding.

For the Garnishing

 Peel the skin of the carrot and peel into long strips.Then slightly trim the strip with a scissors.Cut diagonally into a small diamond shape as shown.

Cut diagonally into a small diamond shape as shown.Arrange it however you want.

Check out my fellow bloggers participating in Blogging Marathon#27.
Also linking to Only-Legumes event happenings my space started by Pari of Foodelicious.

Sumber http://www.naliniscooking.com

Saturday, April 27, 2013

Curd Rice and Some Garnishing Tips


We are entering into the 4 th week of Blogging Marathon and the theme is Miscellaneous and supposed to share some kitchen basics,crafts and garnishing.
Today I am sharing a very simple and comforting food apt for summer and some garnishing tips to make the food more appealing.
Friends I am not a professional food stylist,here I am sharing you the garnishing which I do it to take a decent photos.
I always feel a simple food looks more gorgeous and tempting with garnishing..Now off to the recipe......


Ingredients
IngredientQuantity
Raw rice/Pacharisi1cup
Milk1cup
Curd/yogurt/thayir1/2cup
Green chilly(finely chopped)2no.
Red chilly/varamilagai 1no.
Ginger/Inji(finely chopped)1tsp
Raw mango/maangai(finely chopped)2tsp
Carrot(grated2tsp
Coriander leaves(chopped)1tsp
Curry leaves(chopped)1 sprig
Mustard seeds1/2tsp
Asafoetida/perungayama generous pinch
Saltto taste
Oil2tsp
Method 

  1. Cook the rice in a pressure cooker with 21/2 cups of water for 3-4 whistles.The rice should be soft and mushy. 
  2. Mash the cooked rice with the ladle and add the salt,milk and to it,mix it well. 
  3. Heat a pan with oil and do the tempering with mustard seeds then add the red and green chillies,asafoetida,curry leaves and corianader leaves. 
  4. Finally add the ginger and raw mango stir it once and put off the fire. 
  5. Add this to the rice and mix it well till everything blends. 
  6. Garnish it with grated carrot and fried curd chilly. 
  7. Serve it with pickle. 
 Enjoy................................................................................

How to Garnish

Things needed for garnishing

Ripe red chilly-1no.
Green chilly-1no.
Coriander Stem/stalk-2nos.
Coriander leaves-few
Raw mango slice-1no.


Method

Take the coriander stems and take out the leaves and keep it aside.Now remove the stalk of the chilly carefully and insert a tooth pick in the bottom and remove it.In the hole carefully insert the coriander stem and set it aside.

Now take the mango and peel the skin with the peeler and with the help of the peeler,peel the mango to two inch slice.

Now carefully with the help of scissors cut the mango slice to a leaf shape,then make small slits in the end of both sides.Arrange this on a plate as shown.


Keep the curd rice in a bowl and place it on the plate on the other side of the plate.

Check out my fellow bloggers participating in Blogging Marathon#27.


Sumber http://www.naliniscooking.com

Thursday, April 25, 2013

Kesar Pista Kulfi/Saffron and Pistachios Ice cream


For the final day of blogging marathon #27 under the theme I made kesar pista malai kulfi,I have already posted mango kulfi which is a hit in my family.
Today I wanted to try the kesar pista kulfi using condensed milk and evaporated milk instead of condensing the regular milk.
Use of condensed milk reduces the cooking time as well as makes the kulfi more tastier and rich.Now off to the recipe................................


Basic Information


Ingredients
 
IngredientQuantity
Evaporated milk11/2cups
Sweetened Condensed milk3/4cup
Milk 1/2cup
Milk powder1/4cup
Pistachios(coarsely ground)2tbs
Cardamom powder1/4tsp
Saffron threads10-12


Method

Soak the saffron in a tbs of warm milk an mix the milk powder with the remaining milk,set it aside.
In a heavy bottom pan take the evaporated milk,condensed milk and the milk powder mixture,bring it to a boil.Then reduce the flame and simmer it for 15-20 minutes.

Now add the cardamom powder follows the ground pistachios.Finally add the soaked saffron and mix well,put off the fire.Let it cool dowm to room temperature.

Finally add the soaked saffron and mix well,put off the fire.Let it cool dowm to room temperature.

After cooling fill it in a kulfi or popsicle mould,cover it with the lid and keep it in the frezeer for atleast 8 hours or overnite or till it becomes firm.

Remove it from the mould by running under the warm water to loosen the kulfi,serve it immediately.

Enjoy...........................................................................
  • If you don't have popsicle mould  fill it in a condiment cup or paper cup and cover it with a foil after 2 hours of freezing insert the ice cream stick to it ad freeze it again.
  • The amount of sugar in the condensed milk is enough but if you want add some sugar while boiling.
  • While pouring in the mould mix the mixture every time and  pour it otherwise the nuts and cardamom powder settle in the bottom.


Check out my fellow bloggers participating in Blogging Marathon#27.


Sumber http://www.naliniscooking.com

Tuesday, April 23, 2013

Kathirikkai Murungakkai Pirattal/Brinjal and Drumstick Curry


In summer we get lot of drumsticks and raw mango,ripen mango and the house will be filled with the aroma of dishes with these veggies.As we have both the trees in our garden back in India,my mom makes drumstick and mango sambhar or this pirattal often in season.
Pirattal is kind of curry can be made with or without coconut paste which goes very well with rasam and curd rice or it can be mixed with the white rice.Either way it tastes good,back in India its a seasonal veggie but here in US its available throughout the year in the frozen aisle.Here fresh drumstick is a rare vegetable and its very expensive in season itself,so always use the frozen one.But nothing beats the flavor and the taste of fresh drumstick.Here is the recipe................................


Ingredients

IngredientQuantity
Small round brinjal(Sliced lengthwise)5-6nos.
Drumstick/murungaikkai(2 inch pieces)15-17nos.
Onion(finely chopped)2nos.(medium size)
Tomato(finely chopped)1no.(large size)
Garlic/poondu(thinly sliced) 6-7cloves

Sambhar powder
2tsp
Red chilly powder/milagai podi1/2tsp
Coriander leaves(chopped)2tbs
Curry leaves(chopped)2 sprigs
Fennel seeds/sombhu/2tsp
Salt1tsp
Oil2tbs


Method 
Heat the pan with oil and crackle the fennel seeds,follows onion and curry leaves,saute it for a minute then add the sliced garlic.Fry it till it becomes golden then add the tomato and cook it till mushy.

Then add the sliced brinjal and saute it for a minute or two now add the drumstick pieces and fry it,then add the sambhar powder,chilly powder,turmeric powder and salt.

Mix it well till everything blends,add a cup of water and cook it covered in a medium flame for 6-7 minutes,stir in between.Once the vegetables are almost cooked keep it in a high flame for a minute and the coriander leaves,mix it well.Put off the fire.


Pirattal is ready.
Enjoy....................................................................
  • If you want to use coconut pate add it along with the sambhar powder,just 2 tbs of the paste would be enough for this given amount.
  • Add 2 tsp of oil if the curry is dry and gets stick to the pan.
  • If frozen drumsticks are used then half cook it in the microwave or boiling water with a pinch of salt.
Check out my fellow bloggers participating in Blogging Marathon#27.


Sumber http://www.naliniscooking.com

Instant Bonda from Idly Batter


I make the deep fried snacks rarely and if it is a rainy evening my Hubby always wants some crispy snack with cardamom tea.One such thing I make is this bonda instantly with idly/dosa batter for a rainy evening.This can be made without onions also but sometimes I add onion  along with some shredded cabbage.Now on to the recipe.....................

Ingredients

IngredientQuantity
Idly/dosa batter2cups
Rice flour1/4cup
Gram flour/kadalamaavu1/4cup
Green chilly(chopped) 4-5nos.
Ginger(grated) 1tsp
Onion(thinly sliced)1no.(medium size)
Cabbage(finely shredded)1cup
Curry leaves(chopped)2 sprigs
Coriander leaves(finely chopped)3tbs
Salt1/2tsp
Oilas needed for frying


Method

  • In a bowl take everything except oil and mix it well without adding any water and keep it aside.
  • Heat oil in a frying pan in a medium flame once it becomes hot,wet the hands with water and drop a gooseberry size batter in the oil.
  • Fry it till it becomes golden and crisp.
  • Drain it on a paper towel.
  • Serve it hot along with tea.
Enjoy........................................................

  • Fry it in a medium flame to get evenly cooked.
  • Finely chopped coconut bits can also be added for extra crunchiness and taste.

Check out my fellow bloggers participating in Blogging Marathon#27.

 
Sumber http://www.naliniscooking.com