Thursday, April 23, 2015

Baked Nippattu /Savory Onion Crackers


Nippattu is traditional onion crackers deep fried in the oil but today's version is a baked one.Nippattu can be made with both rice and all purpose flour.Since I opted the baking method I used the all purpose and wheat flour combo.Soon share the deep fired version and this version I tried from Suma's space.It came out so crispy and crunchy and vanished in a day.In the original recipe onion is used but here I used shallots.Try this baked version of nippattu and enjoy.Off to the recipe..............................


                                                                    Baked Nippattu/Savory Onion Crackers


   Basic Information

   Preparation time 20 minutes
   Baking time 25 -30 minutes
   Makes 20-22


   Ingredients


Ingredient
Quantity
All purpose flour
1/2 cup
Wheat flour
1/2 cup
Unsalted Butter
4 tbs
Shallots(finely chopped)
6-7
Green chilly(finely chopped)
1
Red chilly powder
1/2 tsp
Sesame seeds/ellu
2 tsp
Curry leaves(finely chopped)
few leaves
Coriander leaves(finely chopped)
2 tbs
Salt
3/4 tsp


    Method 
  • Take all ingredients given it a bowl,mix it well till it becomes crumbly.Slowly sprinkle water and knead it to stiff dough.Let it rest for 10-15 minutes.
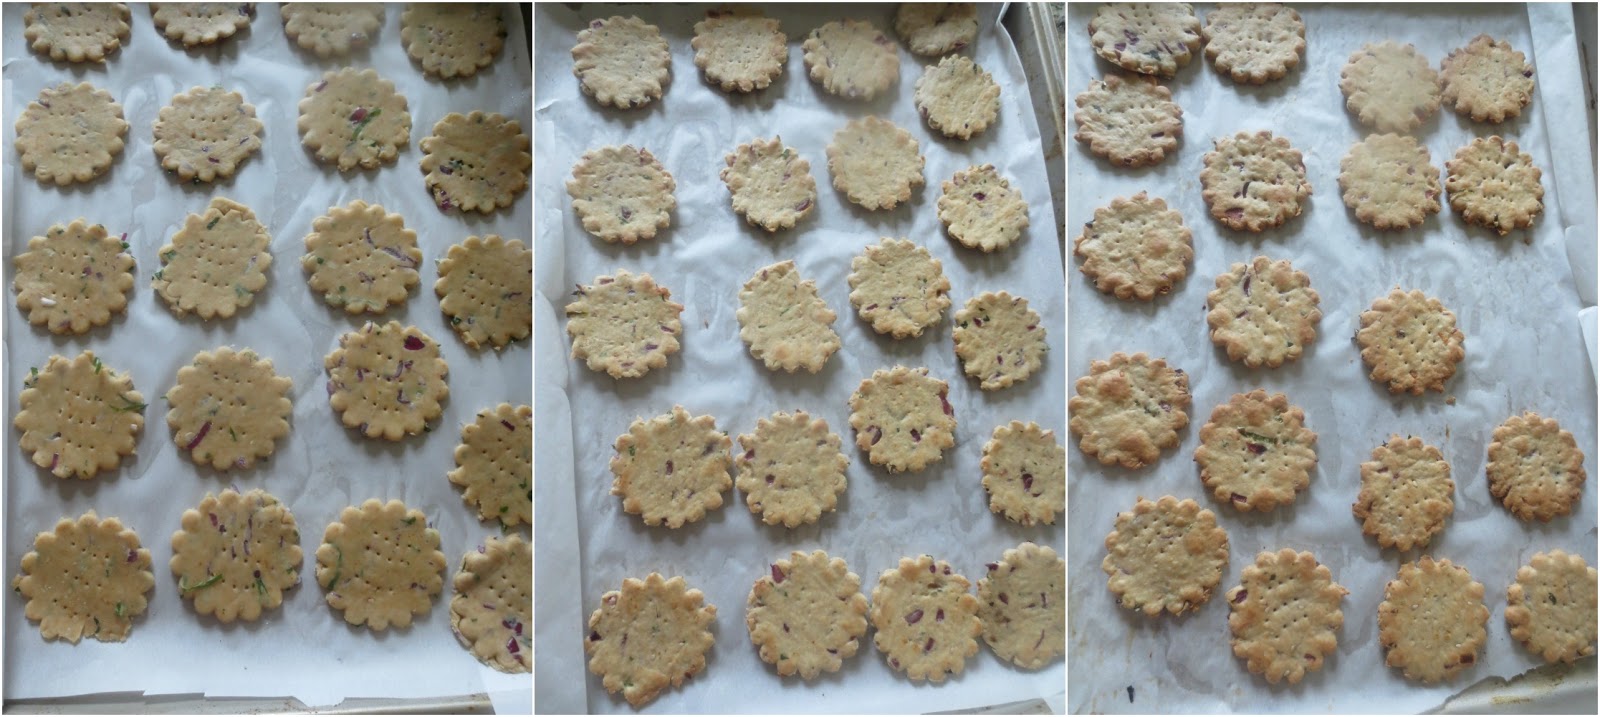
  •  After 10 minutes divide the dough into two,on a floured surface roll in to a circle.It should not be too or too thick.Using a knife or cookie cutter cut it to the desired shape.Arrange it on a lined baking tray.Continue for the rest of the dough.With the help of knife prick it on the surface.
  • Preheat the oven at 350 F and bake it for 25-30 minutes in a preheated oven.After 10 minutes take the baking tray out and flip it to the other side bake it.After cooling store it in an air tight container.
  • Serve it with a cup of tea.


    Enjoy.....................................................


    Sumber http://www.naliniscooking.com

    Wednesday, April 22, 2015

    Baked French Fries


    We are in day 4 of the 4th week of mega Blogging marathon edition and today I am sharing the all time favorite French fries in a baked version.
    Fried version of French fries is so tasty and addictive but the baked version also close to the fried version and crispy.
    If its served warm it tastes like the fried one,but after cooling it is bit chewy.So serve this baked version when it is slightly warm.Here I used the russet potatoes and lets move on to the recipe................


                                                                                                              Baked French Fries


       Basic Information

       Preparation time 10 minutes
       Baking time 40 -45 minutes
       Serves 2 


      Ingredients

      
    Ingredient
    Quantity
    Russet Potato
    3 (medium size)
    Salt
    1/2 tsp
    Black pepper powder/
    milgau podi
    1/2
    Oil
    2 tsp


      Method 
    • Wash the potatoes very well and peel the skin and slice it lengthwise to slightly thick slices.Cut those slices to a long strip.Put the strips in cold water to prevent browning.Rinse couple of times th it.e cut strips in cold waterand drain.Spread the strips on a paper towel or cloth to remove the excess moisture.After removing the excess moisture add the oil and mix it well.Keep it aside.

    • Preheat the oven at 425 F and keep the baking tray also inside.Let it get hot,once the oven is preheated remove the baking tray carefully and spread the potato strips in a single layer.Keep it in the oven and bake it for 15 minutes.After 15 minutes take out the potato strips from the oven and turn it with a wooden spatula.Keep it bake in the oven and bake it,in between remove and turn it couple of times for even baking.Once its completely done sprinkle the salt and mix it well
      • Serve it with ketchup.


      • While baking,take the potatoes out from the oven every 10 minutes and turn it to the other side for even baking..
      • Do not bake it more than 45 minutes it may turn hard or browned.
      • Cut the potatoes to even size strips.


      Enjoy...........................................................................


      Sumber http://www.naliniscooking.com

      Tuesday, April 21, 2015

      Vegetable puff with Homemade Puff Pastry


      Today' recipe under the savory and miscellaneous baking theme for the mega marathon is vegetable puff.
      Vegetable puff always reminds,my college days where we used to eat these puff almost every other day.Our college bus used to stop near the bakery shop and after getting down we used to hit the bakery and enjoy these puff with a cup of tea.
      After coming to U.S,made veggie and egg puff with the store bought puff sheet,almost for every party or get to gathers.After some point we all got bored and stopped making.Its been almost an year we had these.
      But this time I wanted to try making the puff pastry at home and it came out so good.I followed the basic Vahchef method.This method is so simple and easy to make in short span of time and the outcome is a crispy and flaky puff.I baked only 7 puff and kept the rest in the freezer for future use.I made these puff on a sunny day and we were doing the lawn work,so we had it along with the lemonade instead of tea.The puff pastry can also be frozen for later use.I made the pastry on the previous day and made puff on the next day.Lets move on to the recipe...................................


                                                     Vegetable Puff with Homemade Puff pastry


         Basic Information

         Preparation time 1 hour 15 minutes(for pastry and stuffing)
         Resting time 10-15
         Cooking time 20-22 minutes
         Makes 14-16


        Ingredients

         For the Pastry


      Ingredient
      Quantity
      All purpose flour
      2 cups
      Salt
      11/4 tsp
      Granulated sugar/sakkarai
      1 tsp
      Water
      125-130 ml
      Lemon juice
      1 tsp
      Unsalted butter/vennai150 gms
      (approximately 11/2 stick)
      All purpose flour1/4 cup for dusting

        For the stuffing

      Ingredient
      Quantity
      Potato
      3 (medium size)
      Onion(finely chopped
      11/4 tsp
      Carrot(chopped)
      3 tbs
      Beans(finely chopepd)
      1/4 cup
      Ginger&garlic paste
      2 tsp
      Red chilly powder3/4 -1 tsp
      Turmeric powder1/4 tsp
       Garam Masala powder1/4 tsp
      Salt1 tsp
      Coriander leaves(chopped)1 tbs
      Oil1 tbs


        Method 
      • Mix the lemon juice with water and keep it aside.In a bowl mix in the all purpose flour,sugar and salt,mix it well.To this add the water and knead it to a soft dough.To this add around 11/2 tbs of butter and mix it well.Let it sit for 10 minutes.

      • Now take the knead dough on a floured surface and roll it to a rectangular sheet of 10x20 inch with 1/8 inch thickness.Divide the butter to 3 equal portions and keep it aside.Apply a thin layer of one portion of butter to 2/3 portion on the rectangular sheet and sprinkle some flour.
      • Fold in the ungreased part first and to this top fold the butter part.Cover it with a cloth or foil and refrigerate for 15 minutes.After 15 minutes take out the chilled dough and transfer to the work surface.
      • Roll the dough to a rectangular sheet with a rolling pin and apply the second portion of butter to 2/3 of the sheet and fold it in the same way like the first time.Cover it with a cloth or foil and refrigerate for 10 minutes.Take it out and transfer to the floured work surface.
      • Roll the dough again to a rectangular sheet like before and reserve a tsp of butter and apply the butter to the whole sheet and fold it as shown.Then finally apply the reserved butter and sprinkle some flour and fold it.Refrigerate it for 10-15 minutes.The pastry is ready now.


      • While the pastry is resting make the stuffing.Microwave the chopped carrot and beans for couple of minutes with a tsp of water.Pressure cook the potatoes for 2 whistles and peel the skin and mash it well.Keep it aside.
      • Heat a pan with oil and saute the onion till transparent.To this add the ginger&garlic paste then goes in the partially cooked carrot,beans and mashed potato.Add in the spice powders and salt.Mix it well and let it cook for couple of minutes.Finally add the chopped coriander leaves and put off the flame.Let it cool down.

      • Now take the refrigerated pastry sheet and roll it to a rectangular sheet,if needed dust some flour.Cut it to a desired shape and keep a generous amount of stuffing.

      • Apply some water to the edges and seal it and arrange it on a lined baking tray.Brush it with some butter if you want.Preheat the oven at 425 F and bake it for 20 minutes or till a nice golden crust formed in the preheated oven for 20 minutes.Remove it and brush it with butter.

      • Serve it warm with ketchup


      • The pastry can be frozen up to 3 months.
      • Do not bake it more than 22 minutes.

      Enjoy...............................................................


      Sumber http://www.naliniscooking.com

      Monday, April 20, 2015

      Baked Spicy Chickpeas


      Today's recipe is going to be a simple baked spicy chickpeas.We love to munch the store bought deep fried version.
      The baked version make it healthy and guilt free and the taste is close to the deep fried version.The same way green peas, black eyed peas and soya beans can be baked.But if its over baked the chickpeas became hard.So keep watching after 30 minutes of baking and turn in between atleast 3-4 time to ensure even baking.Here I soaked the chickpeas then pressure cooked and baked it.If you want to make it in a scratch use the canned garbanzo beans.Lets move on to the recipe............................................


                                                                                                                Baked Spicy Chickpeas


         Basic Information

         Preparation time 15 minutes
         Soaking time 6-8 hours
         Cooking time 40 minutes
         Makes 2 cups(approximately)


        Ingredients

        
      Ingredient
      Quantity
      Chickpeas/kondai kadalai/
      Dried channa
      1 cup
      Salt
      1/2 tsp
      Red chilly powder/milgai podi
      1/2-3/4 tsp
      Oil
      1 tbs


        Method 
      • Soak the dried chickpeas in enough water and soak it for at least 6-8 hours.Drain the water and add around a cup of water and a pinch of salt.Pressure cook it for 2-3 whistles in a medium flame.Make sure not to over cook.
      • After the pressure subsides drain the excess water and spread it on a paper or towel to remove the moisture.Now spread the chickpeas in a baking tray and sprinkle the red chilly power,salt and drizzle the oil.Mix it well.
      • Preheat the oven at 400 F.Bake it for 40 minutes and every 10 minutes turn it carefully and bake till a nice golden color appears.Remove it and store it in an airtight container after it cools down completely.
        • Serve it as a snack along with tea.


        • Instead of red chilly powder,black pepper powder can be used.
        • Do not bake it more than 45 minutes it may turn hard,sometimes the chickpeas may not be crispy as soon as out of the oven.After cooling it will be crispy .

        Enjoy........................................................


        Sumber http://www.naliniscooking.com

        Sunday, April 19, 2015

        Garlic Coriander Flower Bread/Flower Shaped Garlic Coriander Bread


        Entering the 4th week of the mega Blogging Marathon under baking theme and for this week I planned to showcase the savory recipes and miscellaneous baking.
        Today's recipe is going to be yet another flavorful bread made with Indian flavors such as garlic and coriander.
        For this theme I made a pull apart with the same flavor,but again my bad luck,the clicks are not satisfied due to gloomy weather .
        So wanted to try the same flavor with different shape.When I was searching some videos to shape the bread,this flower shape bread with nutella looks cute and easy to make.So tried in a savory flavor and the result was a very nice and flavorful bread.Here,also I shaped a small quantity of dough to a different flower.You can try your own choice of stuffing.Off to the recipe.........................


                                           Garlic Coriander Flower Bread/Flower Shaped Garlic Coriander Bread


           Basic Information

           Preparation time 30 minutes
           Proofing time 1 1/2 hours+40 minutes
           Cooking time 20-25 minutes
           Makes 1 flower bread


           Ingredients


        Ingredient
        Quantity
        All purpose flour
        2 cups+3 tbs
        for dusting
        Instant yeast
        11/4 tsp
        Olive oil
        3 tbs
        Sugar
        1 tsp
        Milk
        1/2 cup+1 tbs
        Unsalted butter
        1 tbs(for brushing)


           For the filling


        Ingredient
        Quantity
        Unsalted butter
        (room temperature)
        5-6
         Garlic(finely chopped or grated)
        4-5 fat cloves
        Coriander leaves(finely chopped)
        3-4 tbs
        Green chilly(finely chopped)
        2
        Salt
        2 pinches


            Method 
        • Take all purpose flour,instant yeast,salt and oil in a bowl.To this add the luke warm milk and knead it to a soft dough.Knead the dough on a floured surface for 10 minutes till it becomes smooth and elastic.Shape the dough and keep it in a warm place for 1-11/2 hours or the volume of the dough doubled.
        •  Punch down the dough and divide the dough to two equal parts.Divide each portion to 3 equal portions and roll into a round ball.Meanwhile mix in the  butter,chopped garlic,coriander leaves and green chilly.Now roll out the each ball to a 9 inch flat round using a rolling pin on a floured surface.Spread generously the garlic butter filling on the flatten disc.
        • Transfer the rolled disc to a line baking tray.Now continue for the rest of the dough.Keep the second disc on the top of the first and continue stacking for the rest.To mark a center keep a round glass in the center and make 4 slits as shown.Then make it into 8.
        • Finally make 16 slits.Now carefully lift the adjacent portions and twist it in the opposite direction.Stick the ends together.Continue for the rest of the slits.Now seal the edges of the twist.If any stuffing is left just brush it on the top.Cover the tray with the foil or cloth and keep it in a warm place for 30-40 minutes.Before 10 minutes of the second raise preheat the oven at 350F.Now brush the top with butter and bake it in the preheated oven for 30-40 minutes or till a nice golden crust formed.Remove it from the oven and brush it some butter.
        • Take one rolled ball and flatten it to a 3 inch disc.Keep a generous amount of stuffing and pull the edges and close it.On a floured surface flatten it to a 3-4 inch disc and make 8 slits as shown and flip each of the cut portion to form a flower shape.
        • Serve it warm with tea as a snack or an appetizer


        • Here I added a pinch of salt for the stuffing,if you are using salted butter then no need..
        • I used, very finely chopped garlic here,but it can be grated in a cheese grater and used..


        Enjoy......................................................


        Sumber http://www.naliniscooking.com