Monday, December 5, 2016

Sandwich Bread/White Bread/Classic White Bread


Already I have shared a version of no knead white bread but this version I tried from King Arthur.As this version of white bread sounds so simple and easy I tried it.The output was a very nice and perfectly textured bread.This time I was extra careful and waited till the bread was completely cool down then sliced.I made the loaf in the evening time and wait till next morning to slice.Here I used the bread flour it can be substituted with all purpose flour or wheat flour.Try this simple and easy to make loaf bread and enjoy.


                                                 Sandwich bread/White Bread/Classic White Bread


   Basic Information

   Preparation time 20-25 minutes
   Proofing time 2 hours
   Cooking time 30-35 minutes
   Makes one loaf


   Ingredients


Ingredient
Quantity
Bread flour or
 All purpose flour
3.5-4 cups+1 tbs
for dusting
Instant yeast
2 tsp
Unsalted butter/oil
(room temperature)
3 tbs
Sugar
2 tbs
Salt
1.25 tsp
Luke warm milk 
1/2 cup+2 tbs for
brushing
Water
1/2 -2/3 cups

    Method 
  • Take all purpose flour,instant yeast,salt and sugar in a bowl.To this add the lukewarm milk and mix it to a slightly sticky dough. Now add the butter to the dough and incorporate well and knead to a soft dough.
  • On a floured surface knead the dough for at least 10 minutes till it becomes smooth and elastic.If you are using a stand mixer,put everything in the bowl knead in a low speed for 5-6 minutes.Cover it with a damp cloth and keep it in a warm place for raise for an hour.
  •  After 1-1.5 hours the dough would have doubled.Punch down the dough and knead for couple of minutes.Shape the dough to a log. 
  •  Transfer it to a slightly greased 8 1/2" X 4 1/2" loaf pan.Cover it loosely and keep it in a warm place for 30-40 minutes or till it raised to the rim of the pan.Before 10 minutes of the second raise, preheat the oven at 400 F.Brush the rolls with milk or heavy cream or butter.
  •  Bake it for 30 -35 minutes or till a nice golden crust formed.Remove it from the oven and cool it for 2-3 minutes.Remove the bread from the pan and transfer it to a wire rack.Slice it once the bread cool down completely with a serrated knife. 
  • Serve it jelly or jam or use it to make sandwich.


  • Instead of bread flour,whole wheat flour or 2 cups of all purpose and 2 cups of wheat flour can also be used.
  • Here I used 81/2 x 41/2 loaf pan,but for this measurement 9 x 51/2 also works fine.
  • Kneading is very important to get a nice textured bread,so knead it very well till the dough becomes stretchy.
  • Also dough needs to be sticky,if the dough is sticky do not add too much flour.
  • The sandwich picture was taken with one day older bread.
  • The amount of water given is approximate,it can be increased if it is needed to get a sticky dough.
  • Winter or dry weather conditions need more water.
  • First day the bread will be very soft.

Enjoy.............


Sumber http://www.naliniscooking.com

Friday, December 2, 2016

Garlic Knots /Eggless Garlic Knots


Holiday season has started and its a perfect time to bake and keep the house warm.To to celebrate this holiday season we group of bloggers participate in Bake-A-Thon.
Bake-A-Thon is an event started by Valli and in December we have a baking marathon.And we will be posting baked recipes every Monday,Wednesday,Friday with week ends off throughout this month.
For the first day I will be sharing garlic knots,one of our family's favorite recipe.As my kids love garlic flavored bread,I tried this garlic knots.The knots came out so delicious with a perfect texture.I have already shared a version of garlic-coriander pull apart bread.Try this garlic knots and serve it along with some soup for a comforting dinner for the winter holidays.


                                                 Garlic Knots/Eggless Garlic Knots


   Basic Information

   Preparation time 20-25 minutes
   Proofing time 2 hours
   Cooking time 25-30 minutes
   Makes 7-8 


   Ingredients


Ingredient
Quantity
All purpose Flour/maida
1.5 cups+1 tbs
for dusting
Instant yeast
1.25 tsp
Unsalted butter/oil
(room temperature)
3 tbs
Sugar
2 tsp
Salt
1.25 tsp
Luke warm milk 
1/2 cup+2 tbs for
brushing
Water
if needed

 For the garlic butter

Ingredient
Quantity
Garlic/poondu
3-4 cloves
(mined or grated)
Coriander leaves
2 tbs(finely chopped)
Unsalted butter/oil
(room temperature)
3 tbs
Salt
a pinch
   
    Method 
  • Take all purpose flour,instant yeast,salt and sugar in a bowl.To this add the lukewarm milk and mix it to a slightly sticky dough. Now add the butter to the dough and incorporate well and knead to a soft dough.on a floured surface knead the dough for at least 7-8 minutes till it becomes smooth.If you are using a stand mixer,knead in a low speed for 3-4 minutes.Cover it with a damp cloth and keep it in a warm place for raise for an hour.Meanwhile mix the finely chopped coriander leaves ,mince garlic,butter and keep it aside.
  •  After 1-1.5 hours the dough would have doubled.Punch down the dough and flatten the dough.Roll it and cut it into strips as shown.Take each strip and roll it to a rope and make a knot as shown.
  •   Arrange the knots on a lined baking tray and cover it with a foil.Keep it in a warm place for 30 minutes for the second raise.
  •  Before 10 minutes of the second raise pre heat the oven at 350 F.Brush the rolls with milk or heavy cream or butter.Bake it for 20 minutes or till the roll turned golden in the preheated oven.Meanwhile prepare the garlic butter by mixing all the ingredients given and set it aside.Now take the baked rolls from the oven.
  • Apply the garlic butter generously to each roll and keep it in the oven for another 3-4 minutes.Turn off the oven and remove it.
  • Serve it warm.


Enjoy..............


Sumber http://www.naliniscooking.com

Monday, November 14, 2016

Non-Veg Thali / Non-Vegetarian Thali - Chicken Roast


For the final of Thali Theme in BM#70 edition is a non -vegetarian Thali.I mostly try to share vegetarian recipes for Blogging Marathon.But this time I wanted to share a non-veg Thali,which has been in my to do list so long.I never got a chance to cook elaborate non-veg meal on week days and couldn't click picture for thali.
Last week I cooked the chicken thali and saved some food for the photo shoot.The thali has

1.Coconut milk rice
2.Kodi kura
3.Egg Fry
4.Chicken Roast
5.Onion Raita
6.White rice
7.Rasam
8.Rava Kesari

Coming to the recipe,its a simple roast can be made with boneless chicken.The highlight of the recipe is,its doesn't need onion and tomato.All you need to do is just marinate the chicken with the spices for 2-3 hours and cook it.


                                                 Chicken Roast


   Basic Information

   Preparation time 20 minutes
   Marination time 2-3 hours
   Cooking time 30-35 minutes
   Serves 3(generously)


  Ingredients

  
Ingredient
Quantity
Chicken( boneless)
1 lb
Yogurt/thayir
1 tbs
Red chilly powder/milagai podi
1-1.5 tsp
Green chilly/pachamilagai
2-3 (slit lengthy)
Ginger&garlic paste
2 tbs
Coriander powder/dhaniya podi
2 tsp
Turmeric powder/manjal podi
1/2 tsp
Garam masala powder
1/2 tsp
Black pepper powder/milagu podi
1/2 tsp
Coconut (sliced)
2 tbs(optional)
Curry Leaves/karivepillai
2 sprigs
Fennel seeds/sombu
1/4 tsp
Cashews(halved)
10-12(optional)
Lemon juice
2 tsp
Salt
1.5 tsp
Oil
2 tbs
Coriander leaves(chopped)
2 tbs


  Method 
  • Wash and clean the chicken and cut into bite size pieces.Add the spice powders,salt,yogurt and ginger garlic paste to the chicken and mix it well.Keep it in the refrigerator for 2-3 hours.
  • Heat a pan with oil and crackle the fennel seeds,and fry the cashews till golden.Add the curry leaves and toast it.Now add the marinated chicken and mix it well.
  • Keep stirring for 2-3 minutes till the color changes.Now add around a cup of water and cook it covered in a medium flame till the chicken becomes tender.Stir in  between to prevent burning.
  • Now most of the water is evaporated and the chicken becomes tender.Mix it well and cook it uncovered if any moisture is left.
  • At this add the slit green chilly,coconut bits and black pepper powder.Mix  it well and let it cook for another 2 minutes uncovered.
  • Finally sprinkle the coriander leaves and put off the flame.Add the lemon juice and mix it well.
  • Serve it with pulao,roti or rice


  • Here I used the boneless thigh pieces.
  • The amount of green chilies and red chilly powder given is for a medium spice level,can be adjusted as per preference.


Enjoy.........................


Check out the Blogging Marathon page for the other marathoners doing BM#70.


Sumber http://www.naliniscooking.com

Friday, November 11, 2016

Breakfast Thali / Tiffin Thali


Coming to day 2 of Blogging Marathon themed under thali is a breakfast/tiffin Thali.This tiffin thali can be served for either breakfast or dinner.
We make this type of tiffin thali for special occasions,feast or newly married is invited for feast.
Idly and dosa are commonly made breakfast in our households,so included in this tiffin thali.
Today I am sharing the masala idiyappam recipe.Here I used the freshly homemade idiyappam to make the masala idiappam.The same procedure can be used with store bought rice noodles.Cook the noodle as per the instruction and follow the rest of the procedure.


The thali has
1.Rava kesari
2.Idly
3.Ghee Roast
4.Masala Kuzhi Paniyaram
5.Masala Idiyappam

Accompaniments

1.Coconut Chutney
2.Mint/pudina Chutney
3.Chinna Vengaya Chutney/Shallots Chutney
4.Idly podi/Idly Milagai Podi


                                         Breakfast Thali/Tiffin Thali


   Basic Information

   Preparation time 20 minutes
   Cooking time 20 minutes
   Serves 2


  Ingredients

  
Ingredient
Quantity
Idiyappam(crumbled)
1.5 -2 cups
Shallots/chinna vengayam
8-10(finely chopped)
Tomato(finely chopped)
1 medium size
Green chilly/pachamilagai
2-3 (slit lengthy)
Ginger&garlic paste
2 tsp
Red chilly powder/milagai podi
1/4 tsp
Curry leaves/karivepillai
1 -2 sprigs
Garam masala powder
a generous pinch
Lemon juice
1 tsp
Salt
1
3/4 tsp
Oil
1 tbs
Coriander leaves(chopped)
2 tbs


  For the tempering

Ingredient
Quantity
Fennel seeds/sombu
1/2 tsp
Cloves/lavangam
Cinnamon/pattai
1/2 inch
  
  Method 
  • Crumble the idiyappam and keep it aside.Heat a pan with the  oil and do the tempering with the given ingredients.Add the chopped shallots,green chilly and curry leaves.
  • Saute it with a pinch of salt till transparent.Add in the ginger &garlic paste and fry it for a minute.Now add in the chopped tomato and cook it until mushy.At this stage add in all the spice powders,salt.
  • Give it a mix and sprinkle some water and cook it for couple of minutes.Add the crumbled idiyappam to the mixture and mix it gently till everything blends well.Keep it in a flame for a minute.Add the chopped coriander leaves and lemon juice,put off the flame.Mix it well.
  • Serve it warm


  • Fresh or frozen green peas can also be added for extra taste.Just MW it for 3-4 minutes and add it along with tomato.
  • A tsp of ghee can be used along with oil for an extra rich flavor and taste.

Enjoy......................

Check out the Blogging Marathon page for the other marathoners doing BM#70.


Sumber http://www.naliniscooking.com

Thursday, November 10, 2016

Simple Everyday South Indian Thali


After,couple of weeks break,I am starting the blogging with Blogging Marathon 70th edition.For this week I choose the Thali as theme and sharing a simple everyday Tamilnadu style Thali.For this theme I wanted to share some other state Thali.But due to lot of personal work and my laptop issues,finally ended up in making a typical home style food.
Most of the recipes made for this thali were shared already but the beetroot poriyal is a pending post.So sharing the recipe and also used the beet greens and made kootu out of it.Will share the kootu recipe later.
The Thali consists of

White rice
Ennai Kathirikkai Kulambhu
Rasam
Vellarikkai(cucumber) Thayir pachadi/raita
Beet leaves Kootu
Beetroot Poriyal
Paruppu Thogayal
Curd
Arisi Vathal/Vadam aka Ilai Vadam

Coming to the recipe,here I used roasted peanuts in the poriyal to give extra crunch.Instead of peanuts,boiled peas or channa dhal can be used.


                                                                                              Beetroot Poriyal 


   Basic Information

   Preparation time 20 minutes
   Cooking time 12-15 minutes
   Serves 3(generously)


  Ingredients


Ingredient
Quantity
Beetroot(finely chopped)
1.5 cups
Onion(finely chopped)
1 (small size)
Green chilly/pachamilagai
2(slit lengthy)
Red chilly powder/milagai podi
1/8 tsp
Coconut(grated)
2-3 tbs
Peanuts(roasted)
2-3 tbs
Curry leaves/karivepillai
few leaves
Salt
1 tsp
Oil
2 tsp

 For the tempering

Ingredient
Quantity
Mustard seeds/kadugu
1 tsp
Urad dhal/uluthamparuppu
1.5 tsp
Red chilly/varamilagai
1 (broken)
Asafoetida/perungayam
a pinch
  
   Method 
  • Wash the beetroot in the water for 3-4 times in cold water to remove the soil particles.Peel the skin and chop it finely.
  • Take the chopped beetroot in a pressure pan and add a pinch of salt and 2 tbs of water.Pressure cook it for a whistle.
  • Meanwhile heat the oil in a pan,once it becomes hot do the tempering with the ingredients.Add the peanuts and roast it for a minute.Add in the chopped onion,green chilly and curry leaves.Saute the onion for couple of minutes,then add the cooked beetroot,red chilly powder and salt.
  • Give it a mix and keep it a low flame for 2 minutes to become dry.Add the grated coconut and mix it well.Put off the flame.
  • Serve it along with rice and kulambhu.


Enjoy...............................


Sumber http://www.naliniscooking.com

Friday, October 28, 2016

Happy Diwali


                                       Wishing you all a very happy and joyful Diwali


Sumber http://www.naliniscooking.com

Wednesday, October 26, 2016

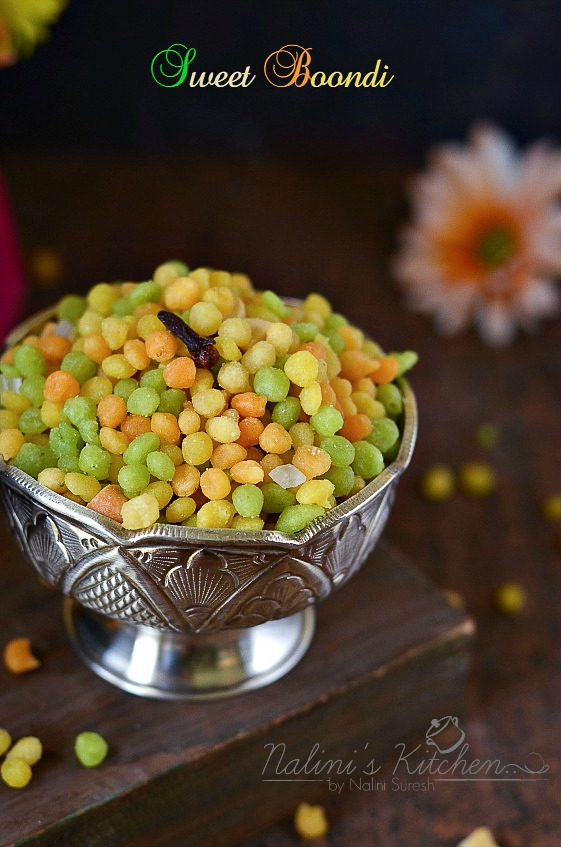
Sweet Boondi / Boondhi / Meethi Boondi


For the final day of the theme,4 ingredients recipe in BM#69 edition is colorful sweet boondi.Boondi and Boondi ladoo are the  authentic sweets mostly made for Diwali in many households.
As my kids love boondi and ladoo,I make either one of them for Diwali.This year,planned to make boondi and like to share the recipe for boondi.As it needs only 4 main ingredients,also fit for the theme.Off to the recipe.............


                                                        Sweet Boondi/Meethi Boondi


   Basic Information

   Preparation time 15 minutes
   Cooking time 35-40 minutes
   Makes 3.5 cups(approximately)


 Ingredients


Ingredient
Quantity
Gram flour/kadalamaavu
1.25 cups
Rice flour/arisi maavu
2 tbs
Salt
1/8 tsp
Baking soda
a pinch
Cardamom powder/ellakai
1/8 tsp
Cashews/mundiri
3-4 tbs(chopped)
Cloves/lavangam
3-4
Sugar/sakkarai
1.25-1.5 cups
Oil
for deep frying


 Method 

  • Take the gram flour,rice flour,salt and baking soda in a mixing bowl.Mix it well,to this slowly add water and make it to a batter.The batter should be in a dropping consistency.Divide the batter into 3 equal portions and add orange, green color to two portions.
  • Heat a pan with oil and once it becomes hot,hold the boondi ladle or a perforated ladle on top of the hot oil.Pour some batter on the ladle and gently tap it.Tiny droplets of batter drop into the oil.Fry it for a minute and remove it from the oil.
  • Drain it on a paper towel.Continue for the rest of the batter.Also fry the cashews and the clove in the hot oil using a ladle and remove it.Add it to the fried boondi.
  • Meanwhile in a wide pan add the sugar and 1/2 cup of water.Let it boil.After 5-6 of boiling check the consistency of the sugar syrup by dropping it in cold water.The sugar syrup should not dissolve in water.Or a single thread is formed when the sugar syrup is pressed in between thumb and for finger.

  • Once the sugar syrup reaches the consistency add the cardamom powder and put off the flame.Now add the the fried boondi and cashews.Mix it well.After 2-3 minutes of mixing add the sugar candy aka kalkandu and mix it well.
  • Let the mixture sit on the counter for 15-20 minutes to absorb the sugar syrup.Mix it well now the coated very well and the boondi becomes dry.
  • Store it in an air tight container.


  • The amount of sugar can be increased up to 1.5 cups but I used 1.25 cups which was enough for us.
  • The consistency of the sugar syrup is important to get it coated well.If it is not in a perfect consistency,the boondi will be soggy.
  • A small mustard size of edible camphor can also be added in the sugar syrup.
  • Check the consistency of the batter by dropping few drops in the hot oil.If it comes out perfect round then proceed.If it has a tail the the batter is too thick and come out flat means its too thin.
  • Wipe the boondi ladle with a clesn wet cloth or paper towel each round to get a nice shaped boondi.
  • Adding rice flour is purely optional,but I add it.


Enjoy........................


Check out the Blogging Marathon page for the other Blogging Marathoners doing this BM#69

Sumber http://www.naliniscooking.com