Thursday, April 9, 2015

Khaliat Nahal/Honey Comb Buns


Khaliat Nahal means bee hives in Arabic and its stuffed with a variety of sweet stuffing and savory.These buns are baked close to each other in a round baking pan to form a honey comb pattern.For the sweet version the honey combs are topped with sugar glaze.
When I wanted to make a sweet version with the stuffing the first thing came in my mind was with tutty frutty as I had a big packet of tutty frutty in the refrigerator I wanted to finish of as early as possible.Along with tutty frutty added some chopped nuts and dessicated coconut.The stuffing can be your choice,chocolate,cream cheese ,dry fruits also used for this one.The buns were so delicious and perfect.Off to the recipe..................


                                                                                    Khaliat Nahal/Honey Comb Buns


   Basic Information
 
   Recipe Source  My Diverse Kitchen
   Preparation time 25 minutes
   Proofing time 1 hour 30 minutes
   Cooking time 25-30 minutes
   Makes 9-10 small size buns


   Ingredients


Ingredient
Quantity
All purpose flour
11/4 cups+1 tbs
for dusting
Instant yeast
11/4 tsp
Unsalted butter
(room temperature )
3 tbs
Sugar
3 tbs
Lukewarm milk
1/2 cup+1 tbs
Salt
1/2 tsp
Milk /butterfor brushing


  For the filling

Ingredient
Quantity
Tutty frutty
4 tbs
Sugar
2 tbs
Chopped cashews and
almonds
1 tbs
Desiccated coconut  
2 tbs
Cardamom powder 
a pinchL

  For the Sugar Glaze

Ingredient
Quantity
Sugar
1/3 cup
Water
1/4 cup
Lemon juice
1/2 tsp


    Method 
  • Take all purpose flour,instant yeast,salt and sugar in a bowl.To this add the lukewarm milk and mix it to a slightly sticky dough. Now add the butter to the dough and incorporate well and knead to a soft dough.Cover it with a damp cloth and keep it in a warm place for raise for an hour.Meanwhile mix the ingredients give for the stuffing and keep it aside.

  •  Make the sugar syrup  by adding water to the sugar and bring it to a boil.Let it simmer for 3-4 minutes.Finally add the lemon juice and put off the flame.Let it cool down completely.
  • Punch down the dough and on a floured surface knead the dough for at least 5-7 minutes till it becomes smooth. Roll the dough to a smooth log and cut it into 9-10 equal portions.

  • Now flatten each roll and keep a generous amount of stuffing and pull the sides and close it and roll it.Keep the rolled bun on a baking tray.Repeat it for the rest and keep it arranged closely in a circle manner to form a honey comb pattern.Cover it and let it rest for another 30-40 minutes.Before 10 minutes of the second raise pre heat the oven at 350 F and brush the rolls with milk or butter.Bake it for 25 minutes in the preheated oven (mine too exactly 22 minutes).
  • Once its done take it out and let it rest for couple of minutes.Now pour the prepared syrup on the top of the buns.The buns should be hot and the syrup should be cool.Let it sit for couple of minutes or till the buns/rolls absorb the syrup

  • Serve it with warm with tea or coffee.


  • Lemon juice prevents the crystallization of sugar syrup and saffron can also be added for extra flavor but I didn't use it.
  • The rolls taste better when it is served warm,just microwave it for 5 seconds and serve. .
  • The sweetness was just perfect if you want it a bit sweeter version then add you can increase the amount of sugar while kneading the dough.


Enjoy...........................................................


Sumber http://www.naliniscooking.com

Tuesday, April 7, 2015

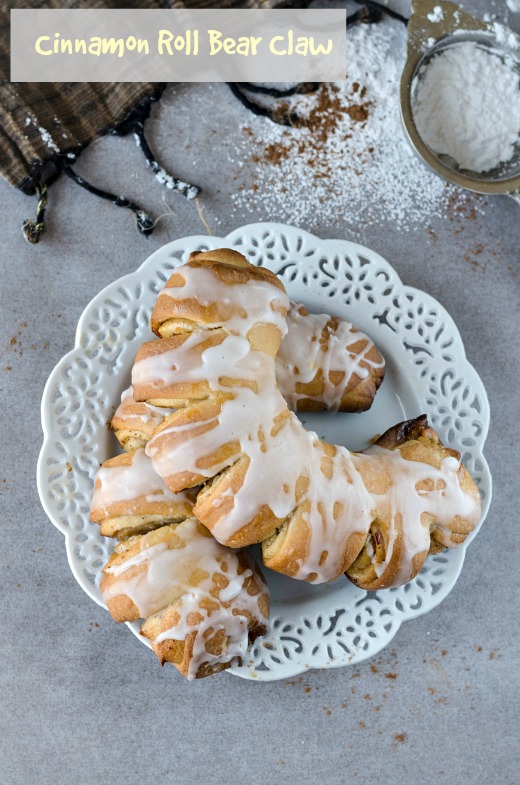
Cinnamon Roll Bear Claw


When I was looking for cinnamon rolls recipe,found a video of shaping the cinnamon bear claw.The shape sounds quiet interesting and attractive.But the recipe was not clearly given and started searching for bear claw recipe,found a very nice recipe here.The shape and picture of the recipe made me to try immediately and came out good.
Coming to the shape I couldn't achieve like the original one and made the roll slightly bigger.Instead of cutting a roll into 3 pieces,I cut into two.The taste was amazing and while baking the house was filled with the aroma of cinnamon.My kiddo enjoyed it to the core and loved the cinnamon flavor.For the given measurement 4 bear claws can be made.I made 2 claws one day and refrigerate the rest of the dough,made cinnamon buns on the next day.As there was no charge in the camera I couldn't take the pictures of it.Off to the recipe...........................


                                                                                     Cinnamon Roll Bear Claw


   Basic Information

   Preparation time 30 minutes
   Proofing time 1 1/2 hours
   Cooking time 30-40 minutes
   Makes 4 rolls (6 inch size)


   Ingredients


Ingredient
Quantity
All purpose flour
13/4 cups+2 tbs
for dusting
Instant yeast
11/2 tsp
Unsalted butter
3 tbs
Sugar
2 tbs
Lukewarm milk
1/2 cup+2 tbs
Salt
1/2 tsp
Milk /butterfor brushing


   For the filling
Ingredient
Quantity
Light brown sugar
1/4 cup
Granulated white sugar
1/4 cup
Unsalted butter
3 tbs
Cinnamon powder
2 tsp

  For the glaze
Ingredient
Quantity
Powdered sugar/
confectionery sugar
1/4 cup
Vanilla extract
1/4 tsp
Milk
1 tsp


    Method 
  • Take all purpose flour,butter,instant yeast,salt and sugar in a bowl.To this add the lukewarm milk and mix it to a soft dough.Knead the dough on a floured surface for 10 minutes till it becomes smooth and elastic.Shape the dough and keep it in a warm place for 11/2 hours or the volume of the dough doubled.

  •  Meanwhile mix the sugars and cinnamon powder in a bowl and line the baking tray with parchment paper.Keep it aside.
  • After the dough has risen well,pinch it down and roll it.Divide the dough into two equal portions.Now slightly floured the surface and roll the each divided to a 12x 15 inch sheet.Brush it with a tbs of butter and sprinkle half of  the sugar-cinnamon mixture.

  • Now carefully roll from the one end and roll it to a log and pinch the ends and seal it.Cut the roll into half and pinch the cut end to seal.Place the rolls on the baking tray and slightly curve it.Now with a help of shears,make 5-6 cuts on the rolled log as shown.Not to cut all the way through.Continue it for the rest of the rolls.

  • Now brush it with the rest of the butter and pre heat the oven at 350 F.Bake the rolls for 30-40 minutes or until golden.Remove it and cool it on a cooling rack.After its completely cool down,mix the powdered sugar,vanilla and milk in a bowl.Drizzle it on the top the rolls using a spoon.

  •  Cut and serve.


    • The dough should be slightly stick,don't add too much of flour while kneading.
    • The rolls taste better when it is served warm,just microwave it for 5 seconds and serve. .
    • The sweetness was just perfect if you want it a bit sweeter version then add another tbs of sugar.
    • The amount of cinnamon powder can be increased according to personal preference.I reduced the amount from the original recipe.
    • For the cinnamon powder,I kept the whole cinnamon in the microwave for a minute and powder it in a coffee grinder and sieve it.


    Enjoy..........................................................


    Sumber http://www.naliniscooking.com

    Monday, April 6, 2015

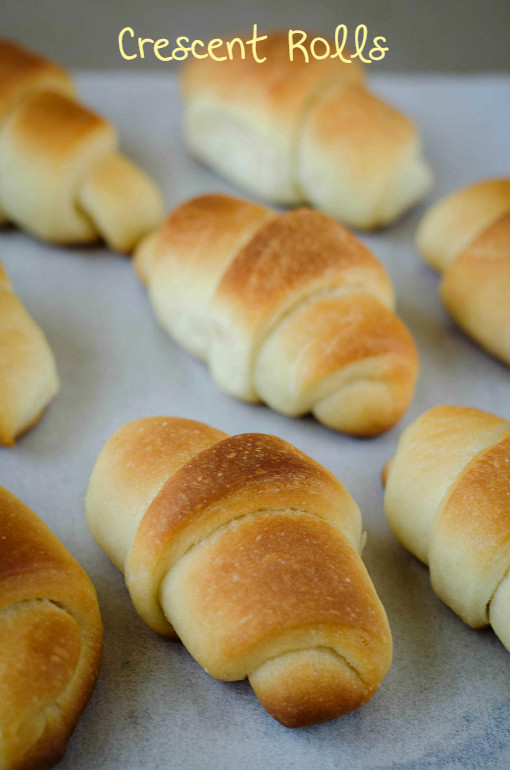
    Crescent Rolls/Eggless Crescent Rolls


    For the second of breads,buns  and rolls theme I am sharing you a delicious crescent roll.My family loves the flaky croissants  available in the super market.But I was bit hesitate to try the amount of butter used  in the recipe and work involved.
    When I was googling for some rolls,suddenly I remembered a recipe I tired long time back from a library book.But I couldn't find out the hand written note,so searched online and finally landed Cooking Classy.
    Again I scaled down the measurement and made these rolls.These rolls are dangerously addictive,soft and light.The taste of the rolls were so close the store bought one but it was not flaky.It doesn't need any spread it can be eaten as such,but if you want some jelly or jam can be accompanied.
    As my kiddo wanted some of the rolls to be with nutella I stuffed half of the batch with nutella.I gobbled two rolls as soon as it was out from the oven and couldn't stop myself munching these yummy rolls.Try these yummy rolls and now on to the recipe....................................


                                                                                          Crescent Rolls/Eggless Crescent Rolls


       Basic Information

       Preparation time 30 minutes
       Proofing time 1 hour 40 minutes
       Cooking time 15-20 minutes
       Makes 24 mini rolls


       Ingredients


    Ingredient
    Quantity
    All purpose flour
    21/4 cups+1 tbs
    for dusting
    Instant yeast
    11/4 tsp
    Unsalted butter
    (room temperature )
    6 tbs
    Sugar
    3 tbs
    Lukewarm milk
    3/4 cup+1 tbs
    Salt
    3/4 tsp
    Milk /butterfor brushing
    Nutella (optional)2-3 tbs 


        Method 
    • Take all purpose flour, 3 tbs of butter,instant yeast,salt and sugar in a bowl.To this add the lukewarm milk and mix it to a slightly sticky dough. 

    •  Now on a floured surface knead the dough for at least 5-7 minutes till it becomes smooth. Transfer to the bowl and keep it a warm place to raise for an hour to 90 minutes without getting disturbed.After an hour the dough would be doubled in size and if you make an indent on the dough it stays.

    • Now punch down the dough and divide it into 2 equal portions.On a floured surface roll the dough into a 10-12 inches circle.Spread evenly 1-11/2 tbs of butter on the circle.Cut the circle into four and cut each quarter to 3 wedges using a pizza cutter or knife.

    • Roll each wedge from the broader side as shown in the picture.Keep the tucked side in the bottom and transfer it to a baking tray.Continue for the rest of the wedges and arrange it on a backing tray.If you are using nutella keep a tsp of it on the broader side and roll it the same way.

    •  Cover the baking tray with a cling wrap and keep it in a warm place for another hour to let it raise. Before 10 minutes of the second raise pre heat the oven at 375 F and brush the rolls with milk or egg.Bake it for 15-20 minutes in the preheated oven (mine too exactly 19 minutes).Once its done brush it with butter and remove it.Cool it on a cooling rack.


    • Serve it with warm with a spread or butter.


    • The dough should be slightly stick,don't add too much of flour while kneading.
    • The rolls taste better when it is served warm,just microwave it for 5 seconds and serve. .
    • The sweetness was just perfect if you want it a bit sweeter version then add another tbs of sugar.
    • If you are using salted butter then no need to add the salt.


    Enjoy.......................................................


    Sumber http://www.naliniscooking.com

    Sunday, April 5, 2015

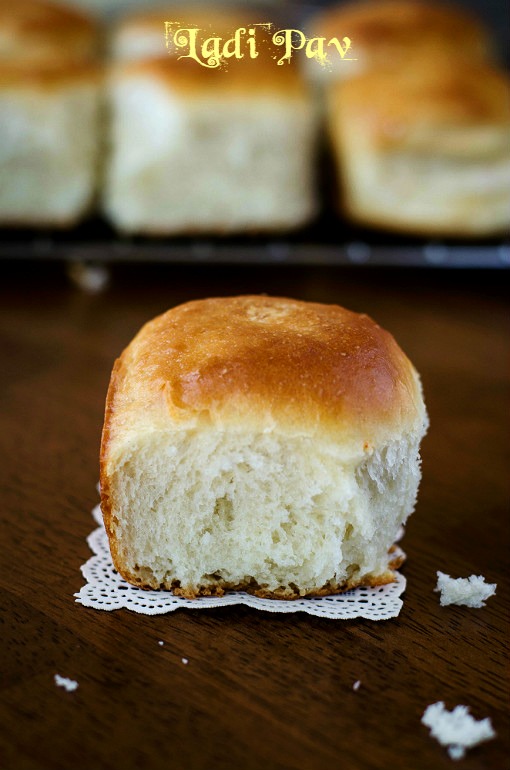
    Ladi Pav /Pav Buns


    After 4 eggless cakes for the first week, I chose to share eggless yeast breads,buns and rolls for the second week of Blogging Marathon #51.When I was thinking to make some breads and buns the first thing came in my mind was the Ladi pav.This recipe I got it from one of my college lecturer long time back.I tried these buns many a times and came out soft and good.
    Whenever I make some kind of dinner rolls or bun,I make it in large quantities But this one,I made it in February when the temperature was in single digit,so had a doubt the dough will raise properly or not.So I scaled down the measurement and used instant rapid raise yeast.I kept the dough next to my cooking range while cooking and it was warm enough to raise.The dough rose well within an hour and the output was soft delicious buns.Lets move on to the recipe.............................


                                                                                     Ladi Pav/Pav Buns


       Basic Information

       Preparation time 15 minutes
       Proofing time 1 hour 40 minutes
       Cooking time 15-20 minutes
       Makes 7 buns


       Ingredients


    Ingredient
    Quantity
    All purpose flour
    13/4 cups+1 tbs
    for dusting
    Instant yeast
    11/4 tsp
    Unsalted butter
    2-3 tbs
    Sugar
    11/2 tbs
    Lukewarm milk
    1/2-3/4 cup
    Salt
    1/2 tsp+a pinch
    Milk /butterfor brushing


        Method 
    • Take all purpose flour,butter,instant yeast,salt and sugar in a bowl.To this add the lukewarm milk and mix it to a soft dough.Cover the dough with a damp cloth  and let it rest for 15 minutes.

    •  Now on a floured surface knead the dough for atleast 10 minutes till it becomes smooth and pliable. Keep.Keep it a warm place to raise for an hour.

    • After an hour the dough would be doubled in size and if you make an indent on the dough it stays.Now punch down the dough and divide it into 7 equal portions.

    • Smoothly roll each portion to a ball and arrange it on a baking tray.Cover it with a plastic cling wrap and keep it in a warm place for another 30-40 minutes.

    •  Before 10 minutes of the second raise pre heat the oven at 375 F and brush the rolls with milk or egg.Bake it for 15-20 minutes in the preheated oven.Once its done brush it with butter and remove it.Cool it on a cooling rack.


    • Serve it with potato Bhaji.


    • The milk should be lukewarm otherwise the yeast won't proof properly.
    • If you are not using instant yeast add the yeast to the lukewarm milk  with a tsp of sugar to activate the yeast.
    • Do not bake it for more than 40 minutes.
    • Pav can be stored in room temperature in air tight container for two days.
    • Do not dust too much of flour otherwise it make the bun so dense and harder.
    • Here I got 7 rolls so I used my square pan and cover the rest of the space with aluminium foil.


    Enjoy.................................................................


    Sumber http://www.naliniscooking.com

    Friday, April 3, 2015

    Eggless Butterless Dates Cake /Dates Cake


    Today is day 4 and its the final day post for this week and the recipe is Dates cake under the eggless cake series.I wanted to try this cake ever since I bookmarked from Divya's space.
    In the original recipe the cake looks dark brown color like a fruit cake.But mine was came out light so pale. Its may be due to the color of the dates and  also I cooked the dates with milk instead of water.That's the reason couldn't achieve a dark brown color like the original one.The cake came out so spongy with a perfect texture and the addition of cardamom powder makes it more flavorful.
    This cake can be eaten as such but it tastes awesome when its served along with a scoop of vanilla ice cream.Off to the recipe..............................................


                                                                                          Eggless Butterless Dates Cake


       Basic Information

       Preparation time 15 minutes
       Cooking time 30-40 minutes
       Makes 8 inch cake


       Ingredients


    Ingredient
    Quantity
    All purpose flour
    11/4 cups
    Dates/perichampazham
    16-20
    Olive oil or any neutral oil 
    6 tbs
    Sugar
    6 tbs
    Baking powder
    11/5 tsp
    Baking soda
    1/4 tsp
    Custard powder2 tbs
    Salta pinch
    Cardamom powder/ellakai1/4 tsp
    Milk1/2 cup
    Cashews/mudiri10-15(chopped)
    Nutmeg and cinnamon powdera pinch each(optional)


        Method 
    • Take all purpose flour,baking soda and powder and sieve it for couple of times.Grease the baking pan with baking spray or oil and dust some flour or put a parchment paper.Keep it aside.
    •  Now in a pan take the milk and dates and cook it for 10 minutes or till the dates become soft.Let it cool down completely and grind it to a fine paste.

    • Pre- heat the oven in 350 F and in a mixing bowl take the oil and sugar,beat it well with a whisker or hand blend till it becomes frothy.Add in the ground dates paste and mix it well.Now add the sieved flour and cardamom powder,nutmeg and cinnamon powder(if you are using).

    • Mix it well with the spatula gently,now add in the chopped cashews and give it a mix.Transfer the cake batter to the baking pan and bake it in the pre- heated oven for 35-40 minutes or a tooth pick comes out clean.After couple of minutes invert the cake to a wire rack and remove the parchment paper.Let it cool completely,after cooling slice it.
    •  Store it in a container,after it cools down completely.


    • If the consistency of the batter is too thick then add some re milk and adjust the consistency.
    • Sieve the flour for couple of times,its necessary to get a nice texture.
    • Do not bake it for more than 40 minutes.
    • This cake can be stored in room temperature in air tight container for two days.


    Enjoy............................................................


    Sumber http://www.naliniscooking.com